Welcome back my fellow radiation nerds. Today we are diving deep into the world of gamma spectroscopy and how can we use it to identify different radioactive isotopes.
So what is gamma spectroscopy?
Gamma spectroscopy is a technique used to identify and analyse different radioactive isotopes based on their characteristic gamma energies that they emit.
Although this technique has been around since the early 20th century, it was after World War II that the technology began to improve, particularly with the development of scintillation detectors, which allowed scientists to perform more detailed analyses of gamma-ray spectra.
By the 1970s, advances in semiconductor technology led to the creation of detectors like HPGe (High-Purity Germanium), which resolutions far surpassing what can be achieved with traditional scintillation crystals.
For much of its history, gamma spectroscopy has been an expensive tool available only to professionals but in recent years, companies like Gamma Spectacular have made it more accessible and affordable to hobbyists and amateurs alike.
Today, devices like the RAYSID fit can easily in a jeans pocket and still deliver excellent-quality gamma spectra, making gamma spectroscopy easier than ever. Long story short, we are currently in a golden age of gamma spectroscopy.

Scintillation Crystals
There are several methods for detecting and creating gamma spectra, but the most common is by using scintillation crystals. Each crystal type has its advantages and drawbacks and the choice which one to use really depends on the use case. Here are some of the most common ones
NaI(Tl) – Sodium Iodide Thalium Doped crystals are probably the most commonly used scintillation crystals and they are known for producing high-quality gamma spectra and being very sensitive to gamma radiation. However, they are hygroscopic (absorb moisture) and temperature-sensitive, making them better suited for controlled environments rather than in field use.
CsI(Tl) – Cesium Iodide, Thalium doped crystal outperform NaI(Tl) in pretty much every way. They are more durable, dont suffer from moisture absorption and produce better resolution. Their only shortcomings are that they are a bit more expensive and have slower light decay time. They are often used in small, portable scintillation devices like my RAYSID, which uses a 5 cm³ crystal that has a resolution of 6.5% at 662 keV.
BGO – Bismuth Germanate scintillation crystals are known for their density and excellent high energy gamma-ray efficiency. At 662 keV, they typically offer an energy resolution of around 10-12%, making them less suitable for gamma spectroscopy applications compared to other crystals..
LaBr3 – Lanthanum Bromide crystal are relatively new to the market but they quickly gained popularity due to their exceptionally high resolution of below 3.5% at 662keV. Unfortunately due to more difficult production process, they are significantly more expensive compared to more common options such as NaI(Tl or CsI(Tl). Since these crystals use Lanthanum, which by itself is a naturally radioactive due to the isotope La138, they self generate a Lanthanum 138 Gamma spectrum which has to be accounted for when conducting a spectroscopy of low activity samples.
Plastic Scintillators are also common and are made from organic polymers but they produce very low quality spectrum which is generally unsuitable for gamma spectroscopy. Their low price however makes them a great fit for detectors meant only for radiation detection.
HPGe – High purity germanium detectors are a bit different. Instead of scintillation crystal, they use semiconductors which results in extremely good resolution allowing to distinguish peaks that are very close in energy range. While they are the gold standard for resolution, they are less suited for casual use due to their size, high cost and difficult maintenance, as they require liquid nitrogen to keep them at their working temperature which is below 110 kelvin.
Crystal size plays a key role when it comes to gamma ray detection. Depending on what will be measured, it is important to take the size of the crystal into the consideration. For detecting low energy gamma rays and X-rays, it is better to use a thin crystal while for detecting higher energy gammas, a thicker crystal would be a preferred choice. For most cases a crystal size between 1-2″ will be perfectly fine

Photomultiplier tubes (PMT)
Photomultiplier tubes are essential as they convert small flashes of light produced during the interaction of the gamma rays with the scintillation crystal, into electric current which is directly proportional to the gamma energies detected. Their quality and performance will impact the final resolution of the gamma spectrum.
Some small portable devices such as my RAYSID use solid-state Silicone Photo Multipliers (SiPM) instead of the PMT found on bigger detectors. This is mainly because SiPM are more compact and don’t require high voltage to operate making better suited for small detectors.
Sometimes PMT don’t come with voltage dividers, which are crucial to supply adequate power to different pins of the tube. Generally the schematics are easily available online but if soldering is not your strong side, it might be better to get a pre-made kit or just buy a probe that is already assembled and ready to use.

My Scintillation probe
I got my Scintillator probe from my good friend GigaBecquerel (https://gigabecquerel.wordpress.com) who was kind enough to send me one of his spare ones and he also helped me with writing and fact checking this post. If you want to learn more about cool nuclear science projects, then I definitely recommend checking out his blog.
The probe itself is a Bicron 2M2/2 and it uses a 2×2″ NaI(Tl) Crystal which should give a resolution of 6.8% at 662keV. Thanks to the large crystal, the probe is very sensitive and it produces around 130CPS just from the background activity alone. Inside my lead castle, the activity drops to just 12 CPS.
Here is a detailed spec sheet of the detector: https://luxiumsolutions.com/sites/default/files/2021-09/s600-8468.pdf
A probes offered by Gamma Spectacular (affiliated):
1.5×1.5″ NaI(Tl) Detector: https://www.gammaspectacular.com/blue/gs-1515-nai?tracking=67a9140c956bd
2×2″ NaI(Tl) Detector: https://www.gammaspectacular.com/blue/GS-2020-NAI?tracking=67a9140c956bd
1.5×1.5″ CsI(Tl): https://www.gammaspectacular.com/blue/gs-1515-csi?tracking=67a9140c956bd
2×2″ CsI(Tl): https://www.gammaspectacular.com/blue/gs-2020-csi?tracking=67a9140c956bd

Spectrometers and the Gamma Spectacular GS-PRO-V5
A scintillator probe is however not enough to start making gamma spectrums. In order to connect the probe to the computer, we need a soundcard Multi-Channel-Analyser (MCA) Spectrometer which will power and convert gamma energies detected by the probe into a usable audio signal.
I’d like to thank Steven from Gamma Spectacular for supporting the channel and sending me one of the GS-PRO-V5 which has inspired this video in the first place.
The unit feels nice and solid and the initial setup was pretty simple and straight forward. It can be used with both single and dual cable probes and its voltage can be easily adjusted from 300 to 2000V making it compatible with a wide range of different detectors. The only change I would make is to move the USB C connector to the back of the device but I guess that is just a matter of personal preference.

There are several different softwares that can be used with Gamma Spectacular but since I personally prefer working on Mac computers, I will be using the IMPUSLE software which has some great features such as a simple and quick, multi-point calibration, and the “energy to bin” switch which makes it much easier to see small peaks from the high energy gamma rays like in the case of Thallium 208 found in the Thorium 232 decay chain.
Get your own Gamma Spectacular (affiliated link): https://www.gammaspectacular.com/blue/gs-pro-v5?tracking=67a9140c956bd
Lead castle and minimising background radiation
One last thing before we get started with creating gamma spectra.
Radioactivity is all around us and it is often referred to as background radiation. It can negatively affect the quality of the gamma spectrum and make it harder to see individual peaks especially when the activity o the sample is low. This is why it is why it is important to try to minimise it. For this purpose it is best to use lead shielding as it’s extremely dense making it very effective at cutting background out.
At the moment, I have two lead castles. The first one I made about three years ago to use with my RAYSID. It’s basically a paint can that has another, smaller can inside and the space between them is filled with lead which creates lead walls that are about 2cm thick from all sides.
While lead is great for shielding radiation, it can fluoresce and this results in a X-Ray peak at around 70-80keV. In order to reduce it, I added 2mm thick copper shielding on the inside of the castle.

Here is a spectrum of Cs137 before and after adding additional copper shielding. Pay attention to the Xray peak at 75keV in the spectrum in which copper shielding is missing


While this castle works great and I get inside only 1.2 CPS with my RAYSID compared to ~35CPS outside, it doesn’t work too well with my new, bigger setup. This lead me to building a second castle for my new setup that will work better with a larger detector.
I made it out of lead bricks that I’ve casted myself and while the castle isn’t yet finish by any means and I still need to make a few changes to it, I can already tell that I’m very happy with the fact that I can keep the detector inside at all time without the need to remove it to access the sample.

In the future I’m hoping to get some proffesional Chevron lead bricks which design eliminates any gaps between them allowing for even better background activity inside the castle.
Lead is toxic, so it’s best to avoid touching it with bare hands. I’ve painted my lead bricks to add a layer of protection which works well as it’s very easy to see when the paint starts to chip off and bricks need a repaint.

How does the set-up perform?
After connecting everything and configuring all the settings, I managed to get a nice 6.96% FWMH at 662keV. Maybe with some extra tweaking I can get the resolution to go even lower but I’m definitely happy with my current results.

While I do get slightly better resolution with my RAYSID with 6.5% at 662keV, this new setup is far more sensitive thanks to the much larger crystal.
Now let’s run some gamma spectrums. Each spectrum has been set to a total count of 100k.
Uranium Ore
Gamma Energies: 144, 186, 242, 295, 352, 609 keV

Radium 226 (Radium painted hand watch)
Gamma Energies: 186, 242, 295, 352, 609 keV

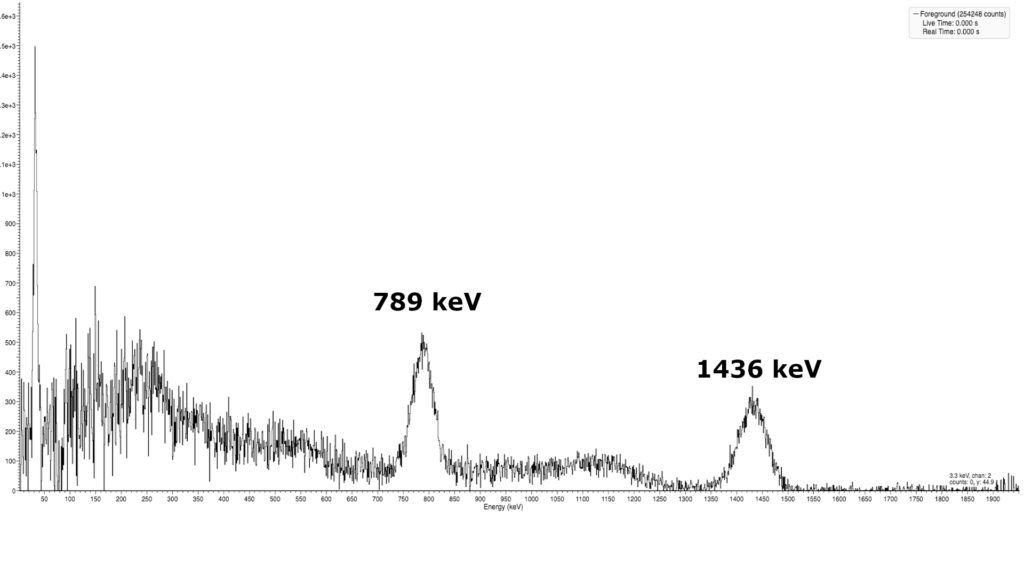
Thorium 232 (Gas Mantle)
Gamma Energies: 129, 239, 338, 583, 911, 969, 1588, 2615 keV

Lutetium 176 (LYSO Crystal)
Gamma Energies: 88, 202, 307 keV

Cesium 137 (Spark Gap Tube)
Gamma Energies: 31, 662 keV

Potassium 40 (Potassium Chloride Powder)
Gamma energies: 1461keV

Americium 241 (Smoke Detector)
Gamma Energies: 59.5 keV

Krypton 85 (Robotron Smoke Detector)
Gamma Energies: 514 keV

Conclusion
Since the day I started learning about radioactivity, I always wanted to be able not only to detect but also identify different radioactive isotopes. I love both of my gamma spectrometers and testing anything I can get my hands on and I can’t wait to do more experiments and tests with them!
My new setup with Gamma Spectacular is now permanently stationed by my desk, connected to my computer and ready to start a new spectrum at a moment’s notice, while my RAYSID travels with me as my daily carry radiation detector, always within reach. Both are excellent tools designed for different purposes and use cases, with the RAYSID offering convenience on the go, while the Gamma Spectacular delivering much higher sensitivity, better versitility and better efficiency.

I want to thank Steven from Gamma Spectacular once again for sending me the GS-PRO-V5 and supporting the channel. If you’d like to purchase a Gamma Spectacular for yourself, make sure to use one of my affiliated links, it doesn’t cost any extra and I get a little commission to fund future videos! Until March 31st, 2025, you can also use my code ALLRAD which will give you 5% off from your order. This code is however limited to the first 10 customers so make sure to use it while it last!
Get your own Gamma Spectacular kit (affiliated link): https://www.gammaspectacular.com/blue/GSB-1515-NAI?tracking=67a9140c956bd
Also make sure to check out GigaBecquerell’s blog and YouTube channel as he has some great content there!
I want to hear from you, do you have a gamma spectroscopy set-up and what devices do you use? Let me know in the comments below!
Thank you so much for reading this post, I hope you enjoyed it and learned something new! If yes, please make sure to subscribe to the email list so that you get notified when new posts are added. Also feel free to check out my Ko-Fi page where you can donate a nice cup of radioactive coffee and support my work financially.
and remember, stay active!