Exploring Naturally Radioactive Elements – Lutetium 176
Welcome back my fellow radiation nerds!
When we think of naturally occurring radioactive elements we mainly think of Uranium and Thorium and maybe sometimes Potassium. While those elements are the most common ones, there are many others that also have naturally radioactive isotopes. However, most of them have very long half-lives making them extremely hard to detect, especially without specialised equipment, but there are a few that can be measured with a sensitive Geiger Counter or Scintillation detector. One of them is Lutetium with its radioactive isotope of Lutetium 176.
If you enjoy this content make sure to subscribe to the channel so you don’t miss any of the upcoming uploads. Thanks and now back to the video!
The Discovery
Lutetium has been discovered independently by three scientists in the year 1907, a French scientist George Urbain, Austrian mineralogist Carl Auer von Welsbach, which you might also know as the inventor of Thoriated gas mantles, and American chemist Charles James. After years of dispute, George Urbain has been named by the scientific community as the discoverer of the new element and he named it Lutetium after Lutetia, the ancient Roman name for the city of Paris.
George Urbain
Carl Auer von Welsbach
Charles James
Properties of Lutetium
Lutetium is a rare earth element with an atomic number of 71. It is the last element in the Lanthanide series and it shares many of the chemical properties with other elements in the group. In nature, it has only 2 isotopes, a stable Lutetium 175 (97.4%) and a radioactive Lutetium 176 (2.60%).
Lutetium 176 undergoes a beta decay with an average energy of 182 keV, turning into Hafnium 176 with a half-life of 37.8 Billion (3.78e10) years, and in the process it also emits gamma rays at 88, 202 and 307 keV. What is Interesting about Lutetium 176 is that the both gamma rays of 202 and 307 keV are emitted in coincidence with each other, forming summing peak at 509keV
RAYSID Gamma Spectrometer (<7% at 662keV resolution)
Uses of Lutetium
Today Lutetium doesn’t see much use due to its difficult production and very high costs but it can be found in some specialised fields. One of its main uses is in the production of scintillation crystals which are used in positron emission tomography (PET) scans.
It can also be found in some alloys like in the case of like LuAG where it improves the overall durability and heat resistance of the material.
And thanks to its long half-life, Lutetium 176 can be used for Lutetium-hafnium dating of meteorites.
My samples & their radioactivity
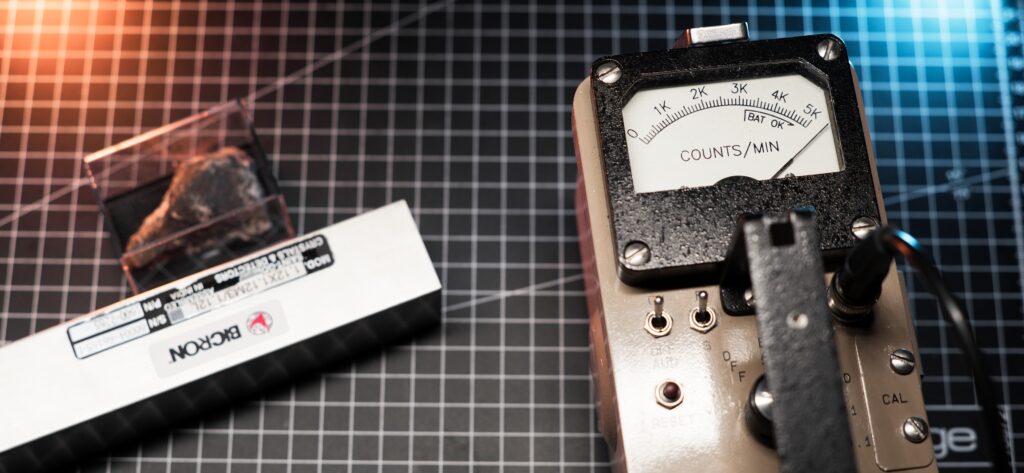
At the moment, I have two types of Lutetium samples. The first one is a form of LYSO scintillation crystals which I got from a friend of mine (thanks James!), I have linked his eBay store in the description below in case you want to grab one for yourself.
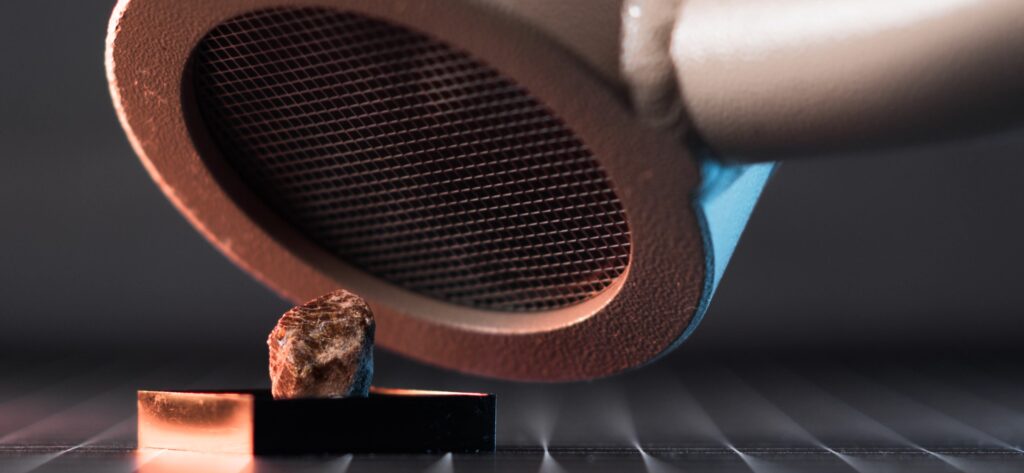
When measured with SE International Ranger which uses a LND7317 Pancake type tube, I got from a single crystal 73 CPM, only 30 CPM over the background radiation. When measured with my RAYSID I got an increase of 15 CPS in the activity which is more than enough to build a gamma spectrum, however a good lead castle to minimise background radiation is definitely a good idea.
As mentioned before, these crystals are used in positron emission tomography (PET) and when exposed to radiation they glow in a light blue colour.
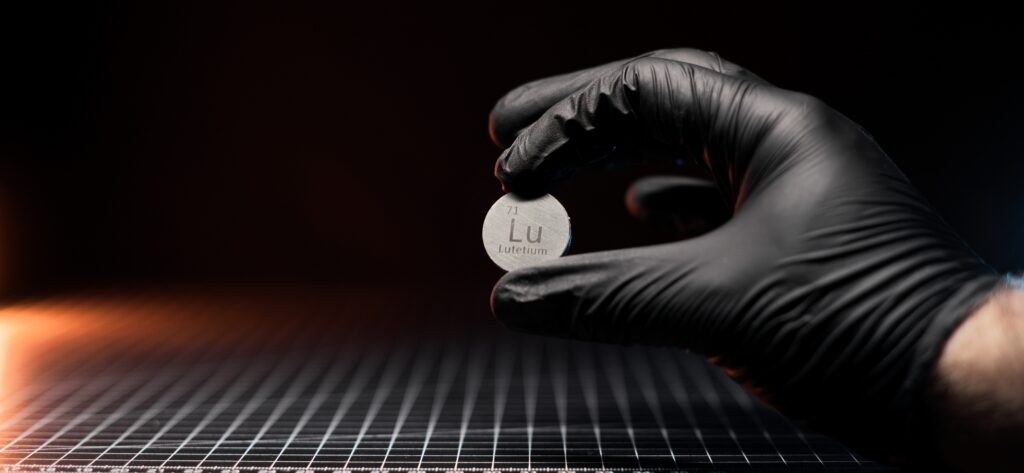
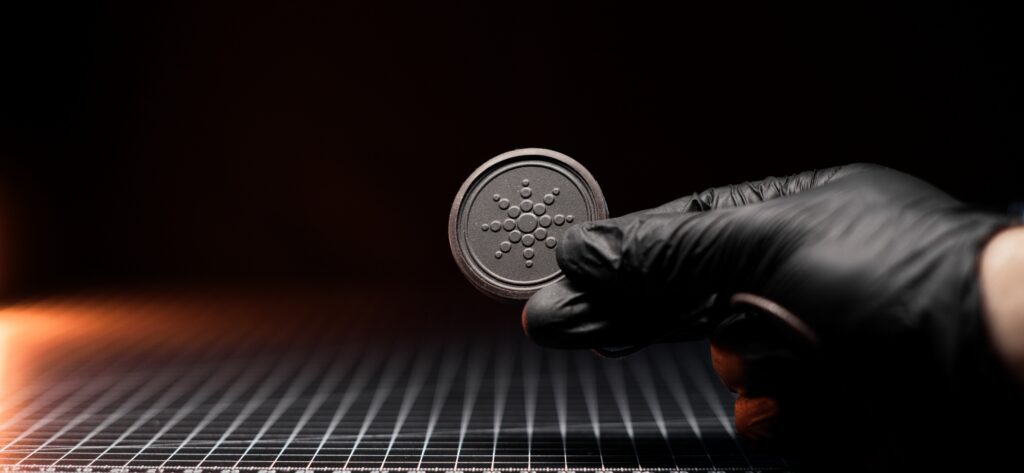
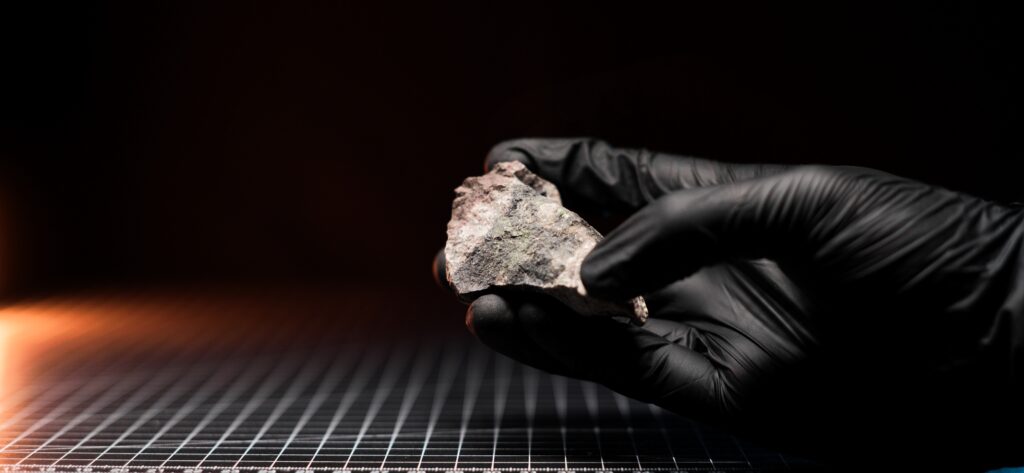
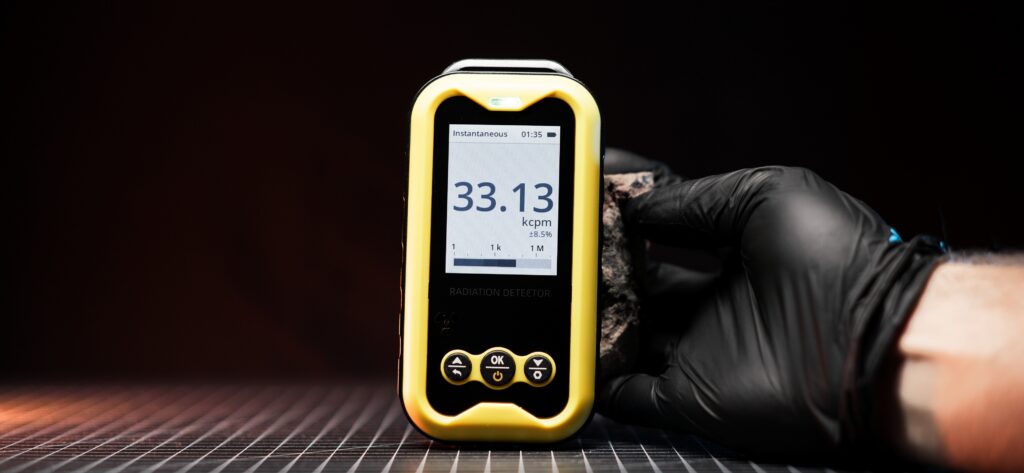
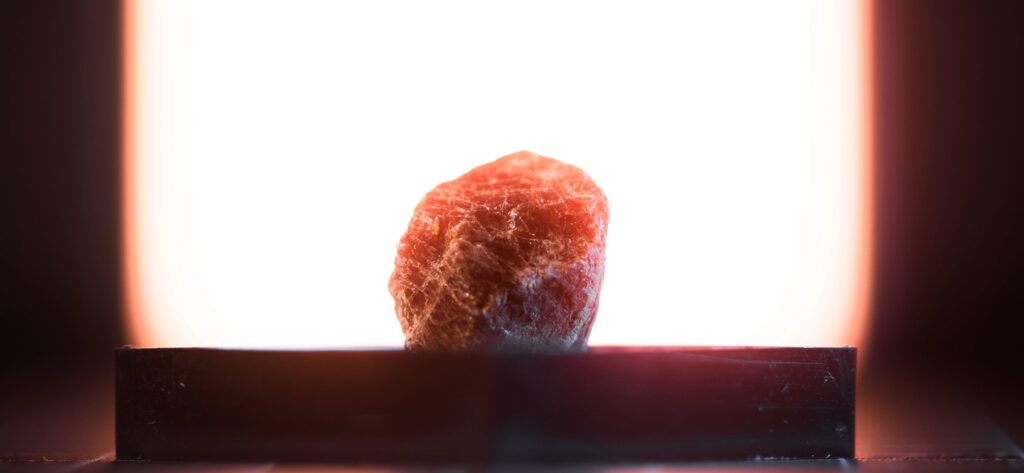
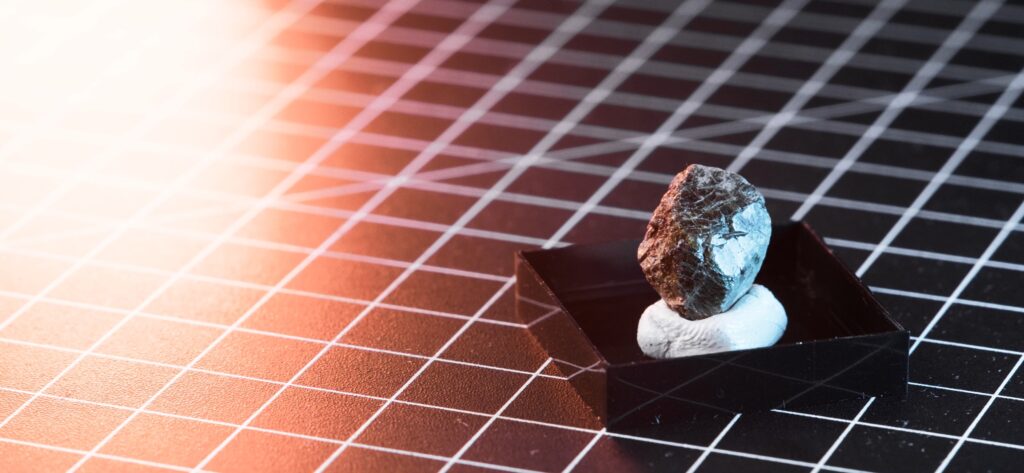
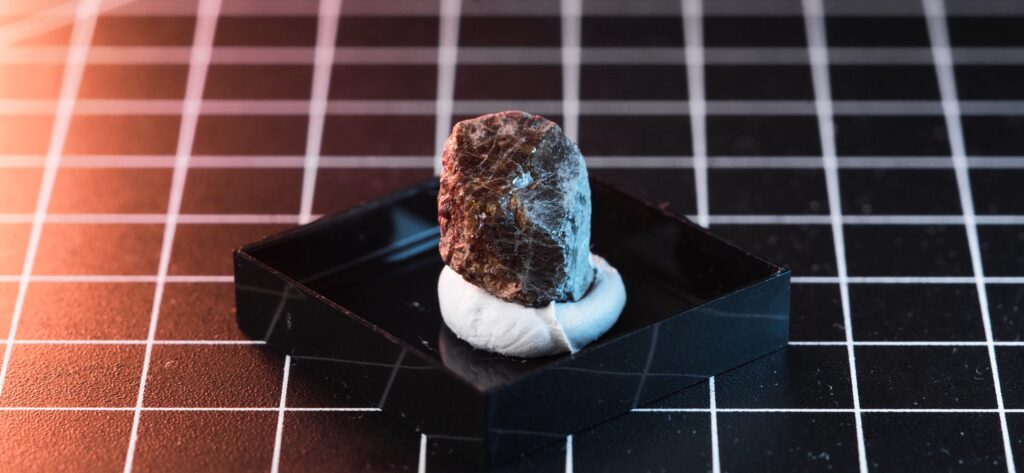
My second sample is a metal coin made out of pure Lutetium metal which measures 24.26 mm x 1.75 mm and weighs about 8.43g, this means it contains around 0.218g of pure Lu176 that has activity of approximately ~432 Bq. Compared to the LYSO crystal, the activity is a bit higher and reads on my Ranger 160 CPM above background and 55 CPS on my RAYSID.
Since the coin is made of pure metal, it is much denser than the LYSO crystal and some of the activity gets self shielded which results in the readings being a big lower than expected.
Since I use it as my main Lu-176 source for gamma spectroscopy, I decided to put it in a 1″ plastic disk with a label stylised a bit after other professional calibration sources. While it might be a bit goofy or silly to some, I do enjoy a consistent look of my sources and I’m very happy with the results.
Isotope Lutetium 177
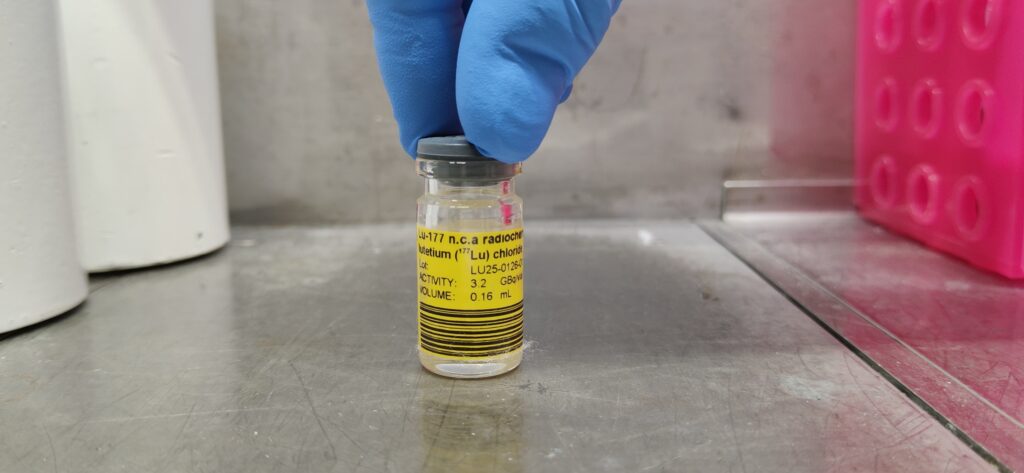
In nuclear medicine, a synthetic isotope of Lutetium, Lu-177 is used in targeted cancer therapy. It is produced by neutron irradiation of Lu176 and it decays through a beta emission into Hafnium 177 with a half-life of 6.65 days and it emits two gamma rays at 113 keV and 208 keV.
A good friend of mine works in a nuclear lab and recently they received a fresh batch of Lu177 for their experiments and he was kind enough to make some videos showcasing the samples, testing them against some of his meters and take a gamma spectrum of them. Big Thanks for the help!
Originally this vial contained 3.2GBq of Lu-177 in form of Lutetium Chloride solution, however most of it has been already removed and now there are only traces of Lu-177 left. Despite that, the vial still read pretty high on the RadEye B20 with over 60k CPM and registered 760uSv/h on the RAYSID.
Summary
Exploring the radioactivity and the history of Lutetium and its isotopes was definitely a great experience and I have learned a lot about it. I want to hear from you, did you know about the natural radioactivity of Lutetium and do you have any samples of it? What other radioactive elements should I cover next? Let me know in the comments below!
Thank you so much for reading this post, I hope you enjoyed it and learned something new! If yes, please make sure to subscribe to the email list so that you get notified when new posts are added. Also feel free to check out my Patron page where you cansupport the channel financially and get some additional exclusive content.
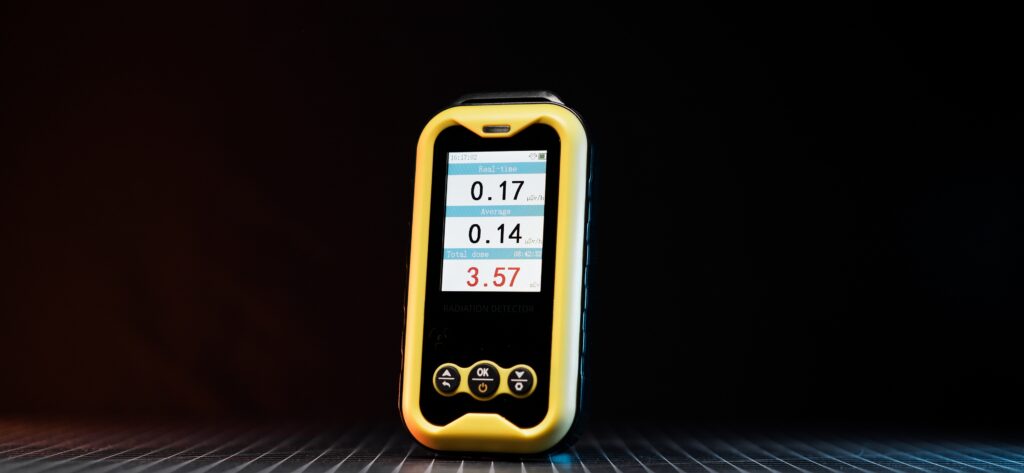
FS5000 – Is This The Ultimate Cheap Geiger Counter?
Welcome back my fellow radiation nerds! Today we are taking a closer look at the FS5000 meter and whether it is the ultimate budget Geiger counter!
If you enjoy this content make sure to subscribe so you dont miss any of the upcoming uploads. Thanks and now back to the video!
For a very long time I had a serious problem with answering one of the most common question in the field of amateur nuclear physics: “Which cheap geiger counter, would I recommend?”.
On one hand, there are plenty of cheap Chinese meters but in most cases they are honestly of very low quality. They suffer from low measuring range, slow averaging time and bad GM tubes that are not sensitive and can be prone to UV pollution.
On the other hand, there are professional devices such the SE International Radiation Alert Ranger which are absolutely fantastic, but they cost almost 10x what the cheap Chinese meters do and they are hard to recommend to someone who is just starting out, even if these meters are definitely worth their price.
So the question is: is there a budget friendly meter that can be bough brand new and that performs decently? Well, the Bosean FS5000 might be just the right answer!
FS5000 – Overview
The FS5000 is very budget friendly geiger counter produced by Bosean. While they are available on Amazon for around 70-80 Euro, I would recommend picking one up from the official Bosean AliExpress store site as they are a bit cheaper there, usually costing around 50 Euro and the only big downside is that delivery will take a few day longer.
The meter has a very simple design which I really like and unlike some other cheap meters, the FS5000 doesn’t look cheesy or anything like that – it feels like a proper measuring device. The body is made out plastic which is pretty decent but I would still avoid dropping it and handle it with care as it doesn’t come with any type of carry case.
The user interface is pretty intuitive and the menus are simple to navigate. The measurements are displayed on a large screen which is decently bright to be used even in bright daylight. There is also a speaker with audible clicking sound which a great bonus but it isn’t very loud and can be hard to hear in some noisy environments and the LED on the top of the meter only flashes when the alarm gets triggered.
The device runs an internal rechargeable battery which should last for about 5 days according to the manufacturer. While battery life is pretty good, I’d prefer if the unit used standard AA batteries which can be easily and quickly swapped out in the field if needed.
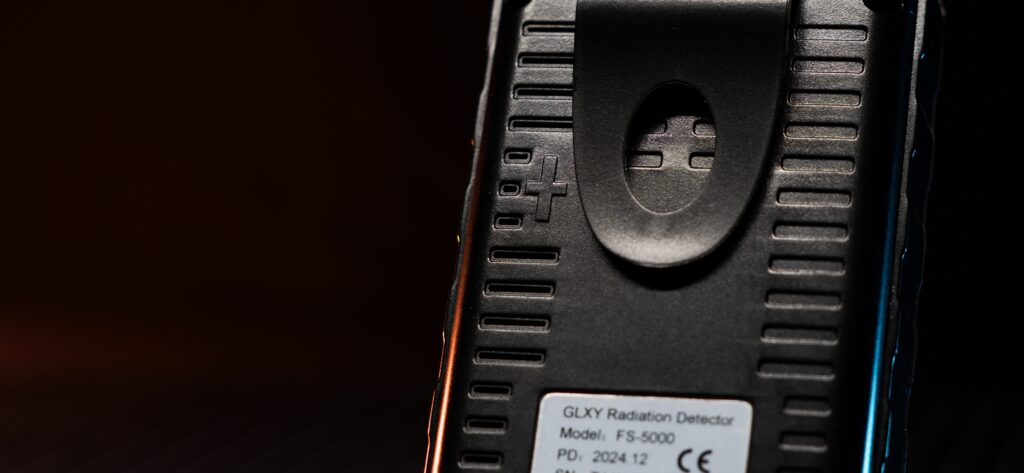
The tube used by this meter is the J321 which is a glass tube and it is ok. It gives around 20 CPM of background and it is able to detect hard beta, gamma and Xray radiation. Compared to other Chinese tubes, it is definitely much better but I wouldn’t call it an ideal design. I’m still waiting for Chinese manufactures to create a tube that can truly rival and beat the good old SBM-20, especially as its supply really dried out in the recent years.
On the bak of the unit there are small opening in the body which allow beta particles to reach the GM tube however there is no beta shield, which is a big bummer as it makes all the dose reading in uSv/h, pretty much pointless as beta activity will highly inflate them. I would really like to see a removable beta shield like on the Terra-P meters added to the future models. Luckily there is a CPM and even CPS mode but with low sensitivity of the J321 tube, I think the CPS is really unnecessary and I would just stick to using the CPM.
When considering the FS5000, make sure that the listing explicitly states that the meter comes with J321 and not some other generic GM tube. While reading through some forums, I noticed that some of these meters came with alternative tubes which have much worse performance and should be avoided.
So how does the FS5000 perform?
I tested my FS5000 meter against a few of my sources which include a negative ion pendant, a thorium gas mantle, a coin made out of pure lutetium metal and a high grade Uranium ore.
As mentioned previously, the FS5000 doesn’t have a beta shield which makes the dose rate reading irrelevant so I will be using the CPM as they display the raw data from the detector. Remember that CPM are dependent on the tube used by the meter and the results measured with a J321 will be vastly different from ones measured with the LND7311 found in my Ludlum 44-9 probe which I normally use.
First up is a Negative Ion pendant which contains Thorium 232. The FS5000 measured pretty low activity and it took the meter a while to show the final result which was 50CPM, only 30 CPM over background. Not an ideal result.
The Thorium gas mantles are pretty common and easy to find check source. This time the FS5000 had no problem with detecting them and I got around 450 CPM. Definitely a better result than with the pendant.
Most budget meters struggle with detecting very low activity samples. This Lutetium coin contains 0.218g of radioactive Lu176 isotope which has an activity of ~440 Bq. It is a very low activity sample but detectable with my more sensitive meters. The FS5000 however struggled with detecting it. The readings eventually did go up by a few counts but it took a while and I don’t think I’d be able to detect in the field. Unfortunately the FS5000 failed this test.
Lastly, I tested the meter against a piece of a high grade Uranium ore and it had absolutely no problem in detecting it but it took over a minute before the final result stabilised at over 36k CPM.
After conducting the stress test, I notice another big problem with the FS5000 meter. It takes a while for the readings to comedown back to background radiation levels after measuring hot samples.
Rad Pro Upgrade
As we discovered, the main issue in most of these cheap Geiger counters is a bad firmware. It usually has slow averaging time which doesn’t adjust to sudden changes in activity resulting in very slow calculation of the measurements. When compared to my RAYSID or my MKC-01CA1M, the FS5000 doesn’t even come close. This is a serious issue which always made me recommend against buying cheap meters.
However, the community is great and a guy called Gissio wrote a custom firmware called RadPro which addresses most of the firmware issues. After installing it, the FS5000 became much more responsive to sudden changes in activity and the new firmware also brought a bunch of new features, which really elevate the usability of the meter.
The only real downsize of this new firmware is that the device eats through the battery much quicker but I think it is a worthy sacrifice. Hopefully this can be optimised in a future update.
I definitely recommend checking it out if you have one of the following meters:
The Bosean FS5000 has positively surprised me with its value for money, especially after installing the custom RadPro firmware. It definitely won’t be replacing my other meters such as the Terra-P or the MKC-01CA1M but I wouldn’t hesitate to recommend it to someone who is just starting out and looking to buy their first cheap meter to begin their journey with radiation detection.
I want ot hear from you! Do you have the FS5000 meter? What are your experiences with it and do you use the custom Rad Pro firmware with it? Let me know, in the comments below!
Thank you so much for reading this post, I hope you enjoyed it and learned something new! If yes, please make sure to subscribe to the email list so that you get notified when new posts are added. Also feel free to check out my Ko-Fi page where you can donate a nice cup of radioactive coffee and support my work financially.
Welcome back my fellow radiation nerds! Today we will take a closer look at a radioactive isotope of lead, Lead 210!
Element Lead 208
The element Lead (Pb) is a dense, heavy metal with an atomic number of 82, making it the heaviest stable element in the periodic table. Despite its high density, Lead is surprisingly soft, which makes it easy to bend and shape. In its pure form, Lead has a silvery grey colour, similar to most metals but if it is exposed to air, it will oxidise and darken over time as a layer of lead oxide forms on its surface.
Lead has been known to humanity since the ancient times where it was a popular material thanks to its malleability and relatively low melting point of 327 °C. For example the Romans, used Lead in plumbing, cookware, and cosmetics. However, they weren’t aware of its toxicity which contributed to many health issues including neurological damage, gastrointestinal problems, and developmental delays.
Today the use of lead is much more limited to help minimise potential health risks it poses but it is still being used in some key industries including production of lead acid battles or in radiation shielding.
In nature, there are several isotopes of lead, with the most common being Lead 208, which makes up 52.4%. This is followed by Lead 206 at 24.1% and Lead 207 at 22.1%. All of these isotopes are stable, but lead also has a few naturally occurring radioactive isotopes. These isotopes, are found in the decay chains of Uranium or Thorium, and aren’t present in typical lead ore. Most of them have a pretty short half-lives ranging from a few minutes to several hours—except one: Lead 210.
Radioactive Lead 210
Lead 210 exists naturally in trace amounts as it is one of the daughter isotopes of Uranium, more precisely it is produced by the decay Polonium 214 through an alpha emission or by the beta decay of Thallium 210. It undergoes a beta decay into Bismuth 210 and it also releases a gamma ray at 47 keV and has a half-life of 22.3 years. Bismuth then undergoes a beta decays into Polonium 210 which finally decays into a stable Lead 206 by releasing an alpha particle.
Very rarely Lead 210 will undergo an alpha decay turning into Mercury 206 which then decays through a beta emission into Thallium 206 which finally decays by releasing a beta particle, turning into a stable Lead 206
Since lead 210 is the only Radon daughter isotope with long half-life, it can accumulate and build up over time in areas where high levels of radon gas are present. This is the case with my DP-63-A, which insides are still heavily contaminated with Pb-210 despite the Radium dial being removed long time ago.
My sample
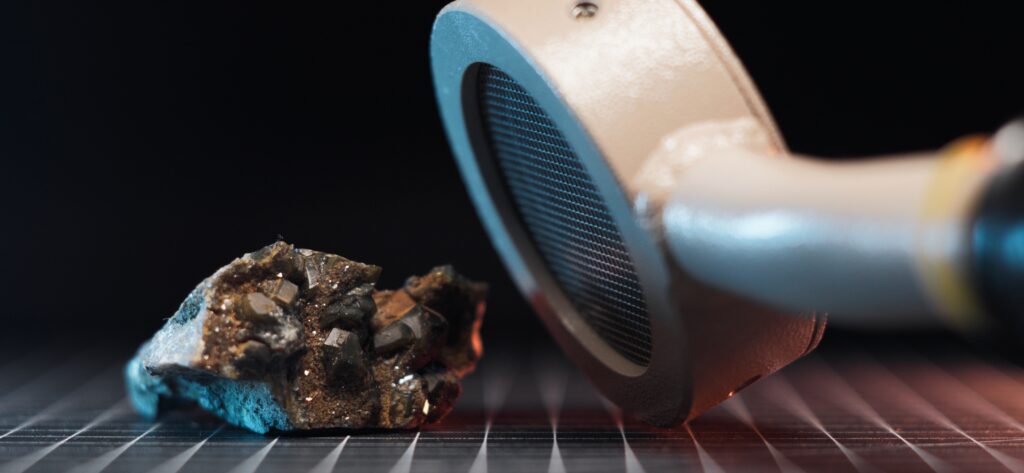
My sample of Lead 210 is a bit of an unconventional one. In order to create it, I used active carbon pallets which I then exposed to a strong radon emitter and I left them sealed in a jar for over two years. After removing the radon source, the jar was highly radioactive due to all the short lived isotopes being present but after a few day, they have decayed leaving only longer lived isotopes including Lead 210 and Polonium 210 inside.
When the lid of the jar is removed, the active carbon pellets reads 500 CPM on my Ludlum Model 3 with a 44-9 probe when measured just above the opened jar. The gamma dose rate is just barely above background and my RAYSID only detects an increase of about 10 CPS when placed right next to the jar.
Gamma spectroscopy
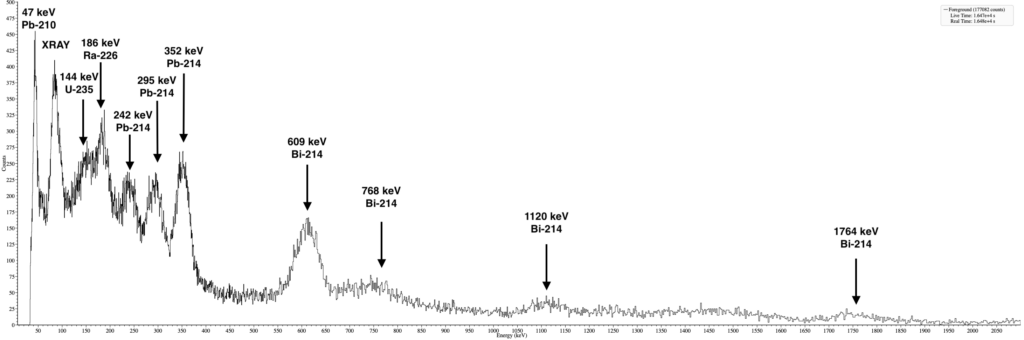
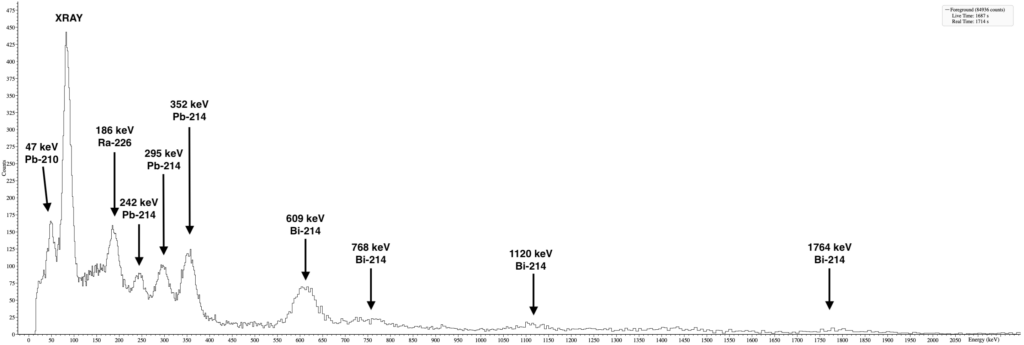
A gamma spectroscopy of my Lead 210 revealed a clear peak at 47keV with a smaller X-ray peak to the left. This peak at 47keV can be also seen in gamma spectra of Uranium or Radium samples which makes it pretty interesting to see how peaks from parent isotopes star to disappear as we go lower in the decay chain.
Gamma spectra made with RAYSID <7% FWHM
Summary
Exploring the radioactivity of Lead 210 was a lot of fun and I certainly learned a lot about it! It definitely showed me that while radon might have a short half-life of only 3.6 days, its daughters will remain radioactive for many years to come.
If you want to find out more about Radon I recommend checking out my previous video on it, which I have linked in the description.
I want ot hear from you! Do you have any Lead 210 samples and what other radioactive isotopes should I cover in the future videos? Let me know in the comments below!
Thank you so much for reading this post, I hope you enjoyed it and learned something new! If yes, please make sure to subscribe to the email list so that you get notified when new posts are added. Also feel free to check out my Ko-Fi page where you can donate a nice cup of radioactive coffee and support my work financially.
Welcome back my fellow radiation nerds, Today we will take a closer look at a budget Bicron scintillator probe and whether it is any good.
What’s the deal with this detector?
The detector we will be covering today is the Bicron 1.12×1.12M3/1.12L (P/N I600-2265). What really caught my attention, is that those scintillators can be found for dirt cheap, often way below 100 euros making them one of the most affordable scintillation probes on the market.
Originally they have been designed for use in portal monitors, which is why these detectors have a quirky, cubic design, and the cable awkwardly sticks out to the side. Since I wasn’t a fan of that, I modified my unit by adding a BNC connector at the back. It was a pretty simple mod, and if you decide to do it for yourself, be sure to properly seal back the detector to prevent any light leaks, as they will permanently damage the photomultiplier tube resulting in the failure of the detector.
However what “counts”, is what is inside and that is a 1.12×1.12×3 inch, NaI(Tl) crystal making the probe very sensitive to gamma radiation resulting in background alone being at around 5-10k CPM. The operating voltage should be between 600V and 1000V and personally I’ve been running the scintillator at 650V without any problems and recently started to use it at 900V so that I can quickly swap out between the scintillator and my 44-9 pancake probe and I haven’t had any issues.
The extra sensitivity of the detector came in handy during my recent trip to the military aviation museum in Berlin, where I could easily pick up Radium dials in the airplanes from even a few meters away.
I’ve also took it on my recent Uranium prospecting trip and it performed fantastically being able to detect rocks buried deep underground, which I wouldn’t be able to find with a traditional geiger counter.
One downside of this detector is that it might be sometimes too sensitive. As mentioned before, the background alone is between 5-10k CPM, which makes only the x10 and x100 scale usable on my Ludlum Model 3 and hot rocks like the ones I found during my trip, will quickly max out my meter. So while the detector did a great job at finding hot spots, I did end up using my RAYSID and BetterGeiger S-2 and S-2L for pin pointing the exact location of the rocks. One solution could be to run the scintillator at lower voltage, maybe around 500-550V which will lower its sensitivity and give a bit more headroom.
One interesting thing about many Bicron scintillators is that they have this weird potentiometer sticking out. It is basically a gain adjustment which allows to control how strong the output is. This doesn’t affect sensitivity but can be useful for gamma spectroscopy and slightly improve resolution.
Gamma Spectroscopy and resolution
Speaking of which, this scintillator is definitely a great tool for detecting radiation, but can it be used for gamma spectroscopy? So far I had chance to test 3 of those units with my Gamma Spectacular GS-PRO-V5 and the results varied drastically from being “ok” at 7.8%, to pretty much unusable at over 13% at 662 keV. It really is a gamble with those detectors and if spectroscopy is a priority for you, then I’d definitely recommend getting a higher-end probe for that purpose.
Summary
Overall the Bicron 1.12X1.12M3/1.12L detector is a real bargain and is definitely worth considering if you’re looking for decent scintillator that wont break the bank. It won’t produce amazing gamma spectra but for radiation detection, it performs fantastically!
I want to hear from you, do you have any scintillator probes in your collection? What do you use them for? Let me know, in the comments below!
Thank you so much for reading this post, I hope you enjoyed it and learned something new! If yes, please make sure to subscribe to the email list so that you get notified when new posts are added. Also feel free to check out my Ko-Fi page where you can donate a nice cup of radioactive coffee and support my work financially.
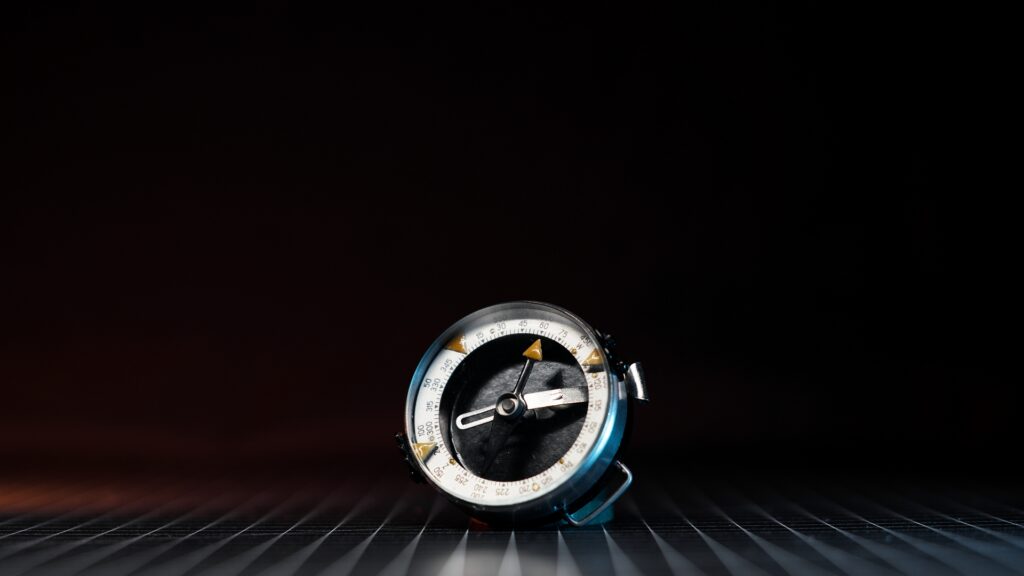
Adrianov’s Compass – Another Radioactive Artefact of the Cold War
Welcome back my fellow radiation nerds. Today we will take a look at another soviet, radioactive artefact from the Cold War, the Adrianov’s Compass!
The history of the compass
The Adrianov’s compass was designed by Vladimir Adrianov in 1907 for the Russian Imperial Army and since then, it served in various countries within the Warsaw Pact until it was eventually phased out in the late 1950s. Although originally intended for military use, the compass became widely adopted by scout groups and other paramilitary organisations.
These compasses used radium paint on the tips of the arrows and few other spots to make them glow in the dark, which also resulted in them being radioactive. Due to their old age, there is no visible glow left and under black light there is a little bit of green fluorescence but the radioactivity is easily detectable..
It is worth mentioning that only the models with metal bodies and orange paint on the arrows used radium. The ones with plastic, white bodies or without orange paint aren’t radioactive.
The built quality of the compass is very solid and there are no loose parts, which definitely helps with containing any bits of radium paints that might have fallen off. This being said, there is a little bit of radon gas leaking out.
On the back there is a logo of the factory in which the compass was manufactured and the year of production. Mine was made in 1956 by SZMO (Śląskie Zakłady Mechaniczno-Optyczne w Katowicach) in Katowice, Poland. Although it is 69 years old, it is still in a great visual condition.
Today these compasses can be easily found pretty cheaply at flea markets, especially in countries that were part of the Warsaw Pact.
Activity and gamma spectroscopy of the compass
When measured with My Ludlum Model 3 with a 44-9 probe, I got a reading of 10k CPM at 1cm distance. The thick glass blocks pretty much all alpha and beta radiation and if removed, the activity from the radium paint will easily max out my meter at over 500k CPM but I strongly advise against opening any items containing radium paint.
The gamma dose from the compass is approximately 5.50 uSv/h when measured with my RAYSID at 1cm distance.
A quick gamma spectroscopy showed clear peaks for Ra-226 and its decay chain.
A few last words
Through out the history, various militaries used countless radioactive items from radium painted watches, airplane gauges to even helmet markers and while those items are definitely great collectables for anyone fascinated with military equipment of the 20th century, it is important to remember to always handle such items with most care, as Radium is a particularly nasty element, and the paint can easily fall apart and contaminate anything it touches. Remember that safety always comes first.
I want to hear from you! Do you have any radioactive watches or compasses? What other radioactive items should I explore? Let me know in the comments below!
Thank you so much for reading this post, I hope you enjoyed it and learned something new! If yes, please make sure to subscribe to the email list so that you get notified when new posts are added. Also feel free to check out my Ko-Fi page where you can donate a nice cup of radioactive coffee and support my work financially.
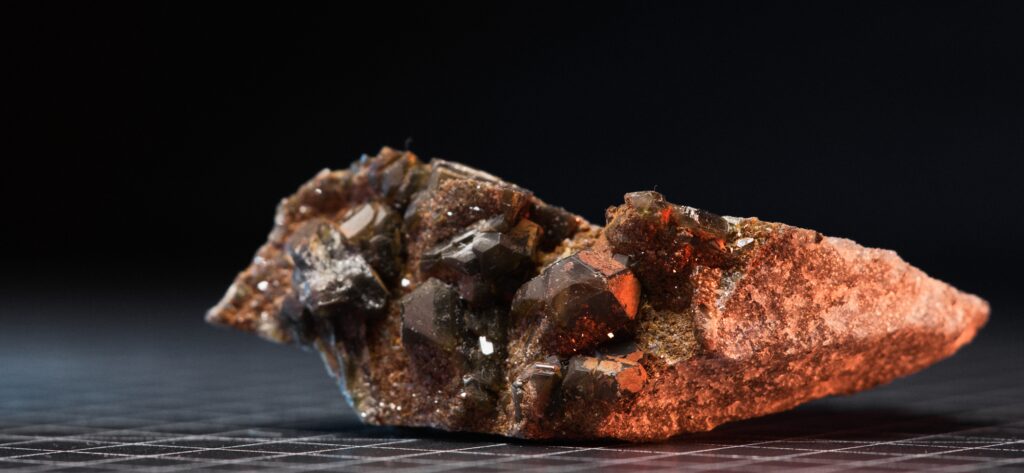
Welcome back, my fellow radiation nerds! Today, we’re diving into the radioactivity and the geology of a very unique mineral called Radio-Barite.
Radio-Barite is a variation of the Barite mineral, and, as the name suggests, it’s radioactive as it contains a small amounts of Radium-226. Since Radium is chemically very similar to Barium it can be easily incorporated into the Barite mineral structure during its formation, if it’s present in the surrounding environment, usually in trace amounts in groundwater or the surrounding uranium minerals. Its chemical formula is (Ba,Ra)SO₄, and its crystals usually have brownish colour and form an orthorhombic structure and score 3–3.5 on the Mohs scale of mineral hardness.
What makes Radio-Barite particularly unique is that it contains radium without its parent isotopes such as Uranium, Thorium or Protactinium, however impurities can sometimes result in the presence of those elements in the mineral. Radium-226 has a half-life of 1,600 years, meaning that for pure Radio-Barite to exhibit detectable radioactivity, it must have formed within the past few thousand years.
Non-radioactive Barite is the primary source of element Barium, which is mainly used in natural gas and oil drilling to prevent blowouts. It’s also added in small amounts to many everyday items. If Radio-Barite is mined instead of non-radioactive Barite, contamination can occur since radium is very difficult to separate from Barium due to their chemical similarities. However, this is rare, as the ore is strictly measured to ensure it doesn’t exceed NORM (Naturally Occurring Radioactive Material) limits.
Gamma Spectrum and activity of my sample
My sample of Radio-Barite comes from Jeníkov in the Czech Republic, a region known for its high-grade uranium deposits. The sample has beautiful, large, brown crystals, which do not fluoresce under black light and are formed on top of quartzite quarry matrix.
Even though Radio-Barite contains only trace amounts of radium, its radioactivity is detectable with most Geiger counters. My sample measures around 400 CPM on my Ludlum Model 3 with a 44-9 probe. The emitted gamma dose rate is rather low at approximately 0.12 µSv/h over background when measured with my RAYSID also at 1 cm distance.
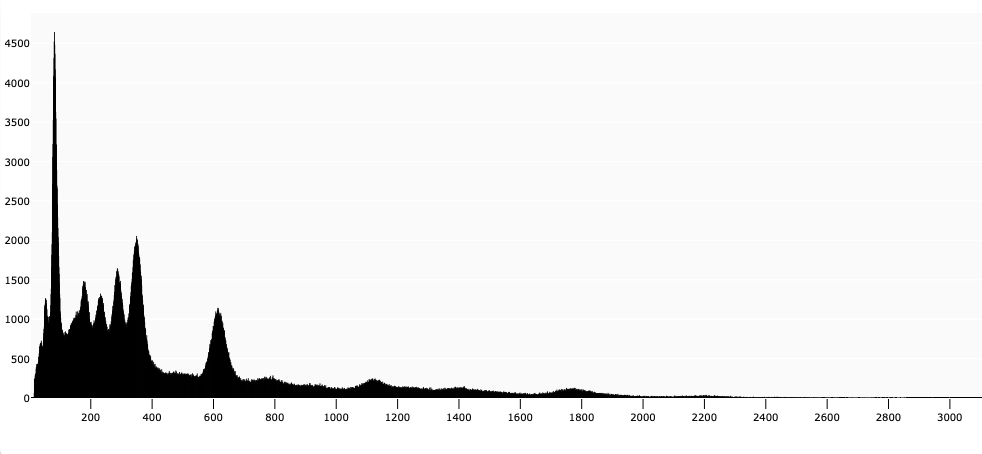
A quick gamma spectroscopy of my Radiobarite mineral revealed an interesting spectrum. I expected to see a clean Ra-226 spectrum but the peak at 144keV indicates the presence of Uranium. This is most likely due to impurities that were picked up by the mineral during its formation in a Uranium rich environment.
For comparison, here is a spectrum of pure Ra-226 from an old radium painted watch. While similar, the U235 peak at 144keV is missing which is distinctive feature between natural uranium and radium spectra.
A few final words
Exploring the geology and the radioactivity of my RadioBarite mineral sample was a lot of fun and I certainly learned a lot about it! I want to hear from you, did you know about the radioactive radio-barite before and do you have any samples of it? What other radioactive minerals should I cover in the future videos? Let me know in the comments below!
Thank you so much for reading this post, I hope you enjoyed it and learned something new! If yes, please make sure to subscribe to the email list so that you get notified when new posts are added. Also feel free to check out my Ko-Fi page where you can donate a nice cup of radioactive coffee and support my work financially.
Welcome back my fellow radiation nerds. Today we are diving deep into the world of gamma spectroscopy and how can we use it to identify different radioactive isotopes.
So what is gamma spectroscopy?
Gamma spectroscopy is a technique used to identify and analyse different radioactive isotopes based on their characteristic gamma energies that they emit.
Although this technique has been around since the early 20th century, it was after World War II that the technology began to improve, particularly with the development of scintillation detectors, which allowed scientists to perform more detailed analyses of gamma-ray spectra.
By the 1970s, advances in semiconductor technology led to the creation of detectors like HPGe (High-Purity Germanium), which resolutions far surpassing what can be achieved with traditional scintillation crystals.
For much of its history, gamma spectroscopy has been an expensive tool available only to professionals but in recent years, companies like Gamma Spectacular have made it more accessible and affordable to hobbyists and amateurs alike.
Today, devices like the RAYSID fit can easily in a jeans pocket and still deliver excellent-quality gamma spectra, making gamma spectroscopy easier than ever. Long story short, we are currently in a golden age of gamma spectroscopy.
Scintillation Crystals
There are several methods for detecting and creating gamma spectra, but the most common is by using scintillation crystals. Each crystal type has its advantages and drawbacks and the choice which one to use really depends on the use case. Here are some of the most common ones
NaI(Tl) – Sodium Iodide Thalium Doped crystals are probably the most commonly used scintillation crystals and they are known for producing high-quality gamma spectra and being very sensitive to gamma radiation. However, they are hygroscopic (absorb moisture) and temperature-sensitive, making them better suited for controlled environments rather than in field use.
CsI(Tl) – Cesium Iodide, Thalium doped crystal outperform NaI(Tl) in pretty much every way. They are more durable, dont suffer from moisture absorption and produce better resolution. Their only shortcomings are that they are a bit more expensive and have slower light decay time. They are often used in small, portable scintillation devices like my RAYSID, which uses a 5 cm³ crystal that has a resolution of 6.5% at 662 keV.
BGO – Bismuth Germanate scintillation crystals are known for their density and excellent high energy gamma-ray efficiency. At 662 keV, they typically offer an energy resolution of around 10-12%, making them less suitable for gamma spectroscopy applications compared to other crystals..
LaBr3 – Lanthanum Bromide crystal are relatively new to the market but they quickly gained popularity due to their exceptionally high resolution of below 3.5% at 662keV. Unfortunately due to more difficult production process, they are significantly more expensive compared to more common options such as NaI(Tl or CsI(Tl). Since these crystals use Lanthanum, which by itself is a naturally radioactive due to the isotope La138, they self generate a Lanthanum 138 Gamma spectrum which has to be accounted for when conducting a spectroscopy of low activity samples.
Plastic Scintillators are also common and are made from organic polymers but they produce very low quality spectrum which is generally unsuitable for gamma spectroscopy. Their low price however makes them a great fit for detectors meant only for radiation detection.
HPGe – High purity germanium detectors are a bit different. Instead of scintillation crystal, they use semiconductors which results in extremely good resolution allowing to distinguish peaks that are very close in energy range. While they are the gold standard for resolution, they are less suited for casual use due to their size, high cost and difficult maintenance, as they require liquid nitrogen to keep them at their working temperature which is below 110 kelvin.
Crystal size plays a key role when it comes to gamma ray detection. Depending on what will be measured, it is important to take the size of the crystal into the consideration. For detecting low energy gamma rays and X-rays, it is better to use a thin crystal while for detecting higher energy gammas, a thicker crystal would be a preferred choice. For most cases a crystal size between 1-2″ will be perfectly fine
Photomultiplier tubes (PMT)
Photomultiplier tubes are essential as they convert small flashes of light produced during the interaction of the gamma rays with the scintillation crystal, into electric current which is directly proportional to the gamma energies detected. Their quality and performance will impact the final resolution of the gamma spectrum.
Some small portable devices such as my RAYSID use solid-state Silicone Photo Multipliers (SiPM) instead of the PMT found on bigger detectors. This is mainly because SiPM are more compact and don’t require high voltage to operate making better suited for small detectors.
Sometimes PMT don’t come with voltage dividers, which are crucial to supply adequate power to different pins of the tube. Generally the schematics are easily available online but if soldering is not your strong side, it might be better to get a pre-made kit or just buy a probe that is already assembled and ready to use.
My Scintillation probe
I got my Scintillator probe from my good friend GigaBecquerel (https://gigabecquerel.wordpress.com) who was kind enough to send me one of his spare ones and he also helped me with writing and fact checking this post. If you want to learn more about cool nuclear science projects, then I definitely recommend checking out his blog.
The probe itself is a Bicron 2M2/2 and it uses a 2×2″ NaI(Tl) Crystal which should give a resolution of 6.8% at 662keV. Thanks to the large crystal, the probe is very sensitive and it produces around 130CPS just from the background activity alone. Inside my lead castle, the activity drops to just 12 CPS.
A scintillator probe is however not enough to start making gamma spectrums. In order to connect the probe to the computer, we need a soundcard Multi-Channel-Analyser (MCA) Spectrometer which will power and convert gamma energies detected by the probe into a usable audio signal.
I’d like to thank Steven from Gamma Spectacular for supporting the channel and sending me one of the GS-PRO-V5 which has inspired this video in the first place.
The unit feels nice and solid and the initial setup was pretty simple and straight forward. It can be used with both single and dual cable probes and its voltage can be easily adjusted from 300 to 2000V making it compatible with a wide range of different detectors. The only change I would make is to move the USB C connector to the back of the device but I guess that is just a matter of personal preference.
There are several different softwares that can be used with Gamma Spectacular but since I personally prefer working on Mac computers, I will be using the IMPUSLE software which has some great features such as a simple and quick, multi-point calibration, and the “energy to bin” switch which makes it much easier to see small peaks from the high energy gamma rays like in the case of Thallium 208 found in the Thorium 232 decay chain.
One last thing before we get started with creating gamma spectra.
Radioactivity is all around us and it is often referred to as background radiation. It can negatively affect the quality of the gamma spectrum and make it harder to see individual peaks especially when the activity o the sample is low. This is why it is why it is important to try to minimise it. For this purpose it is best to use lead shielding as it’s extremely dense making it very effective at cutting background out.
At the moment, I have two lead castles. The first one I made about three years ago to use with my RAYSID. It’s basically a paint can that has another, smaller can inside and the space between them is filled with lead which creates lead walls that are about 2cm thick from all sides.
While lead is great for shielding radiation, it can fluoresce and this results in a X-Ray peak at around 70-80keV. In order to reduce it, I added 2mm thick copper shielding on the inside of the castle.
Here is a spectrum of Cs137 before and after adding additional copper shielding. Pay attention to the Xray peak at 75keV in the spectrum in which copper shielding is missing
While this castle works great and I get inside only 1.2 CPS with my RAYSID compared to ~35CPS outside, it doesn’t work too well with my new, bigger setup. This lead me to building a second castle for my new setup that will work better with a larger detector.
I made it out of lead bricks that I’ve casted myself and while the castle isn’t yet finish by any means and I still need to make a few changes to it, I can already tell that I’m very happy with the fact that I can keep the detector inside at all time without the need to remove it to access the sample.
In the future I’m hoping to get some proffesional Chevron lead bricks which design eliminates any gaps between them allowing for even better background activity inside the castle.
Lead is toxic, so it’s best to avoid touching it with bare hands. I’ve painted my lead bricks to add a layer of protection which works well as it’s very easy to see when the paint starts to chip off and bricks need a repaint.
How does the set-up perform?
After connecting everything and configuring all the settings, I managed to get a nice 6.96% FWMH at 662keV. Maybe with some extra tweaking I can get the resolution to go even lower but I’m definitely happy with my current results.
While I do get slightly better resolution with my RAYSID with 6.5% at 662keV, this new setup is far more sensitive thanks to the much larger crystal.
Now let’s run some gamma spectrums. Each spectrum has been set to a total count of 100k.
Since the day I started learning about radioactivity, I always wanted to be able not only to detect but also identify different radioactive isotopes. I love both of my gamma spectrometers and testing anything I can get my hands on and I can’t wait to do more experiments and tests with them!
My new setup with Gamma Spectacular is now permanently stationed by my desk, connected to my computer and ready to start a new spectrum at a moment’s notice, while my RAYSID travels with me as my daily carry radiation detector, always within reach. Both are excellent tools designed for different purposes and use cases, with the RAYSID offering convenience on the go, while the Gamma Spectacular delivering much higher sensitivity, better versitility and better efficiency.
I want to thank Steven from Gamma Spectacular once again for sending me the GS-PRO-V5 and supporting the channel. If you’d like to purchase a Gamma Spectacular for yourself, make sure to use one of my affiliated links, it doesn’t cost any extra and I get a little commission to fund future videos! Until March 31st, 2025, you can also use my code ALLRAD which will give you 5% off from your order. This code is however limited to the first 10 customers so make sure to use it while it last!
Also make sure to check out GigaBecquerell’s blog and YouTube channel as he has some great content there!
I want to hear from you, do you have a gamma spectroscopy set-up and what devices do you use? Let me know in the comments below!
Thank you so much for reading this post, I hope you enjoyed it and learned something new! If yes, please make sure to subscribe to the email list so that you get notified when new posts are added. Also feel free to check out my Ko-Fi page where you can donate a nice cup of radioactive coffee and support my work financially.
Welcome back my fellow radiation nerds. Today we will explore the radioactivity and the nonsense of some more quantum science, scalar energy quackery items sold on Amazon!
If you enjoy this content make sure to subscribe to my channel so you don’t miss any of the upcoming uploads. Thanks and now back to the video.
In the past I explored the radioactivity of two “Quantum Energy” pendants. In both cases they have turned out to be radioactive due to the Thorium content. Since then, most of those listings have been removed but occasionally they do pop up every now and then on websites such as Amazon.
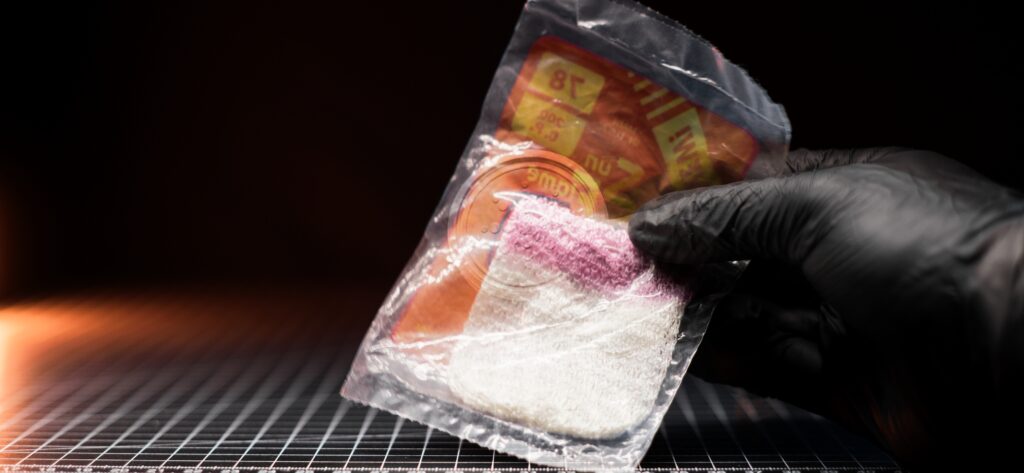
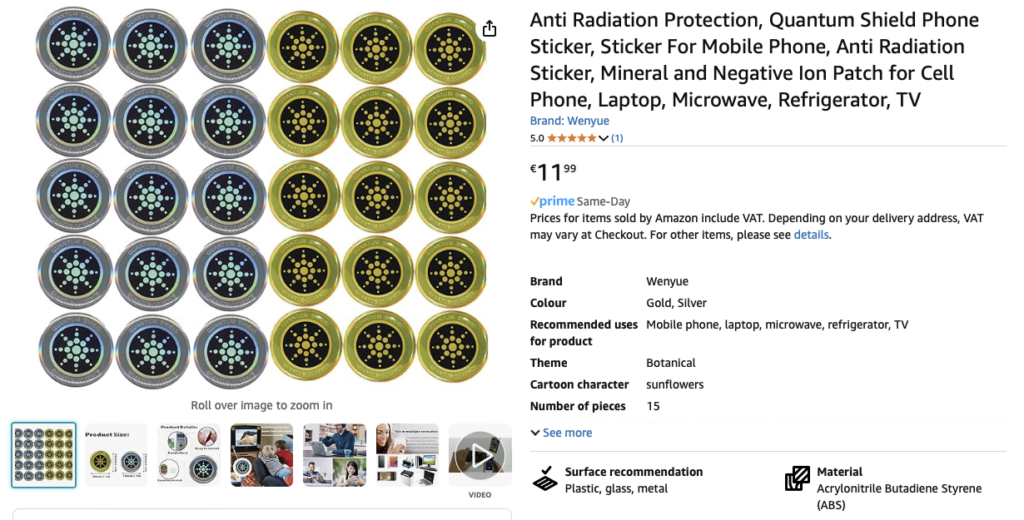
Recently I was browsing through the internet and I found some “quantum energy”, stickers which I haven’t really explored before, so I decided to order them, and see if they will be radioactive.
Sticker Nr.1
The first sticker was marketed as an anti radiation sticker that will protect the user from the “harmful” 5G radiation… Right. The definitely not photoshopped stock photos on the listing, recommend placing the stickers on all electrical devices such as phones, tablets, laptops and TVs…
Despite the stickers being marketed as anti radiation, I measured pretty decent radioactivity coming off of them. When measured from the front, I got a result of 250 CPM and 700 CPM when measured from the back of the sticker at 1cm distance, with my Ludlum Model 3 with a 44-9 probe. Im guessing that the silicon layer blocks some of the alpha and beta radiation resulting in lower activity from the front.
I was curious about how was the sticker constructed and which part in particular made it radioactive, so I used my trusty Swiss knife to peal its layers one by one and conducted a little autopsy of it.
The sticker is made of three parts, silicon top, shiny middle part and sticky brown layer at the bottom. After measuring each part separately I found that the brown bottom layer was the radioactive one.
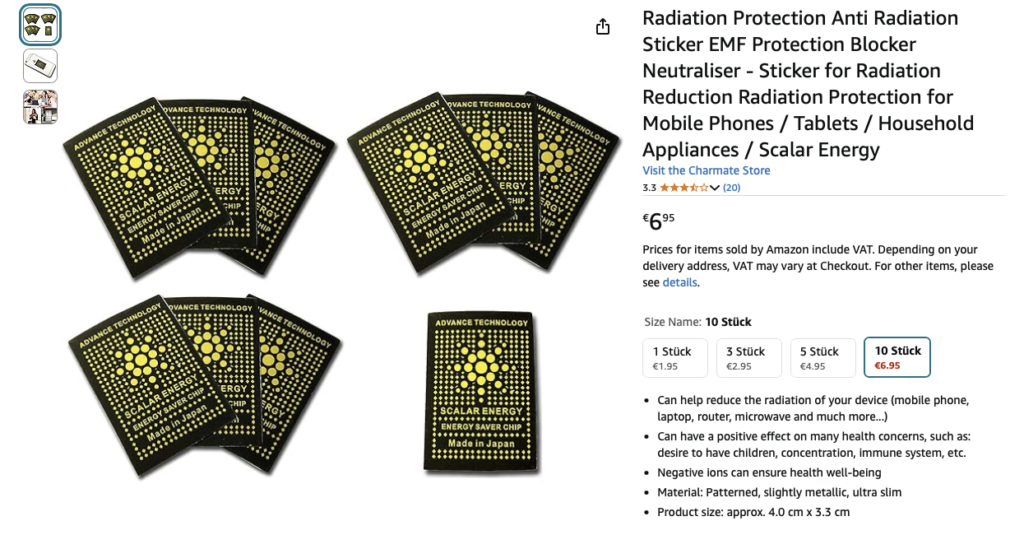
Sticker Nr.2
The second sticker was marketed as advance technology, Scalar Energy, Energy Saver, Made in Japan anti radiation protection…
and surprise surprise, when measured with my Ludlum Model 3 with 44-9 probe, I got a reading of over 2000 CPM at 1 cm distance.
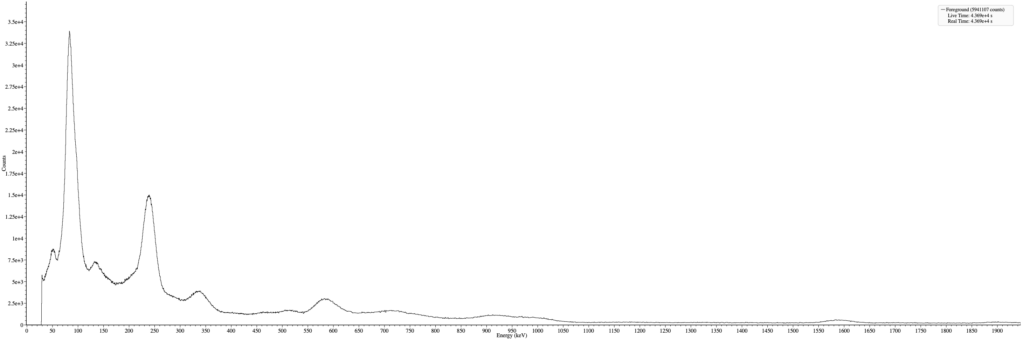
Gamma spectroscopy and analysis of radioactive isotopes inside the stickers
The two pendants I explored before contain radioactive Thorium 232 and I was curious if that will also be the case with these stickers. To find out, I conducted a gamma spectroscopy with my RAYSID gamma spectrometer which revealed that both of the stickers contained radioactive Thorium 232 and its decay products.
Thorium ore (Monazite) is pretty common in China, in fact it’s much more common there than uranium which is why China is currently investing heavily into Thorium breeder reactors. I’m assuming Thorium is a waste product of Monazite processing as Monazite is rich in several other rare earth elements but I have absolutely no idea why is it being added to those stickers… I guess it at least makes a pretty cool check source for all of us nuclear nerds?
While those stickers are a pretty cool and relatively safe source to handle, their marketing is very misleading and they should definitely not be sold on Amazon or similar websites under their current description. Just remember that, some people still believe in tin foil hats…
Thank you so much for reading this post, I hope you enjoyed it and learned something new! If yes, please make sure to subscribe to the email list so that you get notified when new posts are added. Also feel free to check out my Ko-Fi page where you can donate a nice cup of radioactive coffee and support my work financially.
Welcome my fellow radiation nerds! Today we explore the radioactivity and the geology of the most common Thorium mineral – Monazite!
Monazite is a brownish phosphate mineral, primarily known for containing several of the rare earth elements, including Lanthanum, Cerium, and Thorium. It scores between 5.0 and 5.5 on the Mohs scale of mineral hardness and has a density of 4.6–5.7 g/cm³.
Compared to other Thorium minerals, such as Thorianite (70–80% ThO2) or Thorite (5–20% ThO2), Monazite contains much less Thorium, at around 6-7%. However, its widespread availability makes it the most common Thorium ore, accounting for approximately 12-15% of the world’s total Thorium reserves.
Monazite is most often located in placer deposits of sand and gravel. It’s primarily found in countries like India, Brazil, South Africa, Australia and China but it can be also found in many other places around the globe.
Fun fact: China is a major producer of Monazite due to its demand for rare earth elements, which also results in a significant surplus of Thorium. This surplus is playing a key role in driving the development of Thorium reactors as a potential alternative to uranium-based ones. It is also partially why there are so many radioactive “Scalar Energy Negative Ion” devices from China, as they contain trace amounts of Thorium from the Monazite extraction process.
Variations of Monazite
Monazite is not a single mineral, but rather a group of minerals with very similar structures and properties but with slightly different dominant elements. There are several variations of Monazite, with five main types. Three of these variations contain radioactive Thorium while another three contain Lanthanum (La) which does have a naturally radioactive isotope of La-138, but its radioactivity is extremely low and generally difficult to detect, especially in the presence of Th-232.
monazite-(Ce), (Ce,La,Nd,Th)PO4 (the most common)
monazite-(La), (La,Ce,Nd)PO4
monazite-(Nd), (Nd,La,Ce)PO4
monazite-(Sm), (Sm,Gd,Ce,Th)PO4
monazite-(Pr), (Pr,Ce,Nd,Th)PO4
Mining History
Since Monazite is rich in the rare earth elements, it has been their primary source for many years.
In the 1880s, Carl Auer von Welsbach was looking for a supplier of Thorium to produce his newly invented thoriated gas mantles. One day he noticed that Brazilian ships used Monazite sand as ballast, and soon, Brazil became a key supplier of Thorium for the production of the gas mantles
For many years, Brazilian and Indian Monazite dominated the industry. However, after World War II, much of the mining activity shifted to South Africa.
Unfortunately, due to the radioactive waste produced during Monazite processing, it was eventually phased out in favor of Bastnäsite in the 1960s, which contains much less Thorium making it safer to work with.
In the recent years, the growing interest in Thorium reactors as a potential alternative to Uranium reactors has sparked renewed interest in Thorium. This shift could lead to an increased demand for Thorium and possibly bring Monazite back into commercial use.
My Sample
I acquired my sample at a recent mineral trade show. It’s the most common variation, Monazite-(Ce), and it comes from the Marijao Pegmatite region in Madagascar. Despite its small size, its radioactivity is easily detectable, reading around 2000 CPM on my Ludlum Model 3 with a 44-9 probe at a 1 cm distance.
Although I already know from its chemical formula that Thorium is present, I decided to do a Gamma Spectrum of the sample with my RAYSID gamma spectrometer. As expected, it revealed peaks characteristic of the Thorium-232 and its decay chain.
Conclusion
I’d love to hear about your experiences with Monazite or other Thorium-containing minerals. Do you have any in your collection? Let me know in the comments below!
Thank you so much for reading this post, I hope you enjoyed it and learned something new! If yes, please make sure to subscribe to the email list so that you get notified when new posts are added. Also feel free to check out my Ko-Fi page where you can donate a nice cup of radioactive coffee and support my work financially.
Welcome back my fellow radiation nerds! Today we will dive deep into what is arguably one of the best radiation meter out there, the Ludlum Model 3!
The history of Ludlum Meters
The Ludlum Measurements, Inc. was established in 1962 by Don Ludlum, who was an engineer with a background in designing radiation detection equipment. Not long after, it has produced its first commercially available meter, Ludlum Model 2. Ludlum’s official YouTube channel has a very interesting video on one of the very first units ever made with a serial number of 31, which I have linked in the description below.
His meters quickly gain popularity and good reputation for their reliability and long use life, which quickly established Ludlum Measurements as a trusted name in the world of radiation detection. The success of the initial models paved the way for the development of a wide range of survey meters and radiation detection equipment that continues to be used around the world to this today.
The versatility of Ludlum Meters.
Ludlum meters are the go to meters for many scientists and first responders, because of they are extremely rugged, reliable and easy to use design. Furthermore, Ludlum Measurements offers a wide range of probes and accessories which can be easily swapped out for various applications. Adding the long and proven track record, it is easy to see why Ludlum meters became the preferred choice for scientists worldwide.
Different Ludlum models
If you look at Ludlum’s product range, you will quickly realise that there are a bunch of different models out there. However for the personal use purpose, I think these are the ones worth considering.
Ludlum Model 2 – It is most basic, analog meter that Ludlum made (discontinued but can be found used). It has the 3 operating mode x0.1, x1, and x10 which might not be enough if you plan using it with sensitive detectors such as scintillator probes.
Ludlum Model 3 – A step up from Model 2. It offers extended measuring range (x100) and improved circuitry and electronics.
Ludlum Model 12 – Supports internal voltage measurement for easy switching between different probes which might require different operating voltage. For that reason, it also has an extended voltage range (400 to 2500 Vdc).
Ludlum Model 14c – Overall similar to Model 3, however it houses a small, gamma compensated GM tube which automatically operates when the scale is set to the x1000 mode.
Ludlum Model 2221 – Digital scaler/ratemeter with advanced data logging capabilities, often used for more precise and detailed measurements.
Ludlum Model 2241 – General-purpose scaler/ratemeter with a digital display.
There are plenty more of Ludlum models out there and if you want to learn more about them, I encourage you to read the detailed description on Ludlum website (click here).
Technical data and features of Ludlum Model 3
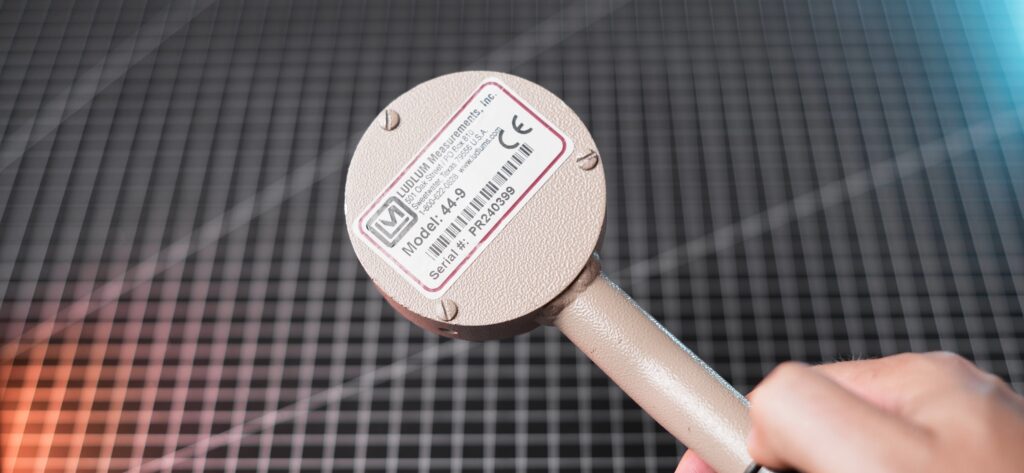
The Ludlum Model 3 has a range from 0 to 500,000 CPM and can supply voltage to the probe between 400 and 1500V. This flexibility allows it to work with a wide variety of detectors, including scintillators and some neutron detectors. Most of the time, I pair mine with a 44-9 probe, however I do change that occasionally depending on the situation
The meter features a rotary switch for selecting different measuring ranges and performing a battery test. It also includes both slow and fast averaging modes, which are particularly useful for obtaining accurate readings in varying conditions.
Powered by two D cell batteries, the Model 3 offers approximately 2000 hours of use. The batteries are housed in a separate compartment, which helps protect the electronics from potential damage in case of battery leakage. Additionally, all parts of the Ludlum Model 3 are sealed to prevent moisture from entering the meter, enhancing its durability.
These features clearly demonstrate that Ludlum meters are built to last and why they’ve earned their stellar reputation.
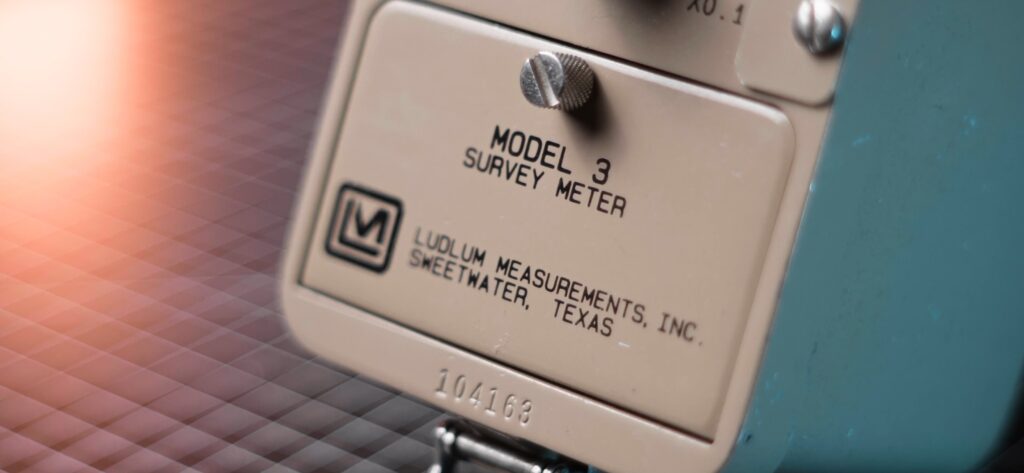
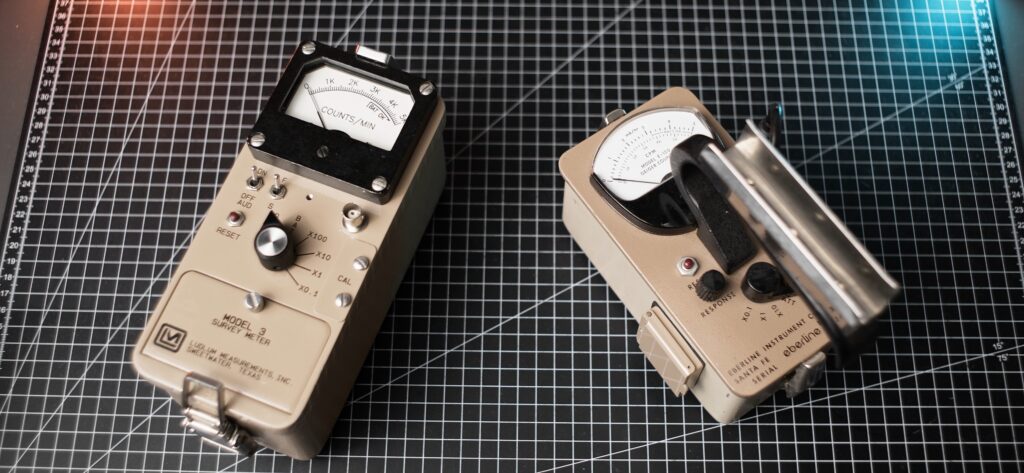
My Ludlum Model 3
I acquired my Ludlum model 3 a few years ago, and it has been my primary meter ever since. It has a serial number of 104163 and it was manufactured on April 16th, 1992. Despite its age, it operates flawlessly, having only small scratches from regular use. In order to ensure accurate readings, I calibrated my unit using a pulser made by GEOelectronics.
My unit has meter face showing only CPM. If you have seen my previous video on how to measure radioactivity, you know I am not a fan of dose units when used to measure activity of samples, so this works perfect for me. Ludlum does offer different meter faces for different probes, however I’d still recommend to sticking with the CPM.
Originally, my meter came with a “C” type connector, which is common on most Ludlum devices. However, this connector is hard to come by in Europe, so I replaced it with a BNC connector. This modification has made it much easier to find compatible cables and probes. The meter also came equipped with latches for a strap, which, while I don’t use them often, are a handy addition for prolonged use, as the meter can get heavy. Lastly, I crafted a probe holder for my 44-9 from a sheet of metal. While it’s not the most aesthetically pleasing, it gets the job done. I’m also thinking about adding a check source holder to the side of my meter, however I can’t seem to find one for a good price.
How to buy a Ludlum meter?
So, you want to buy a Ludlum meter. But where can you find one?
If you’re set on a brand-new meter, you can purchase directly from the Ludlum website. However, be aware that their prices are generally aimed at labs and government agencies, not private individuals. A new Ludlum Model 3, for example, costs around $1,000, and that’s without any additional accessories or probes.
In my opinion, it’s a far better choice to buy a used (or refurbished) unit online. Labs occasionally clear out old inventory, and this is the best time to find used meters and probes at a relatively low price. I got my meter during one such sale for fraction of what a new one would cost me.
When evaluating a used meter, ensure it’s in good visual condition (no dents, corrosion on battery ports or cracked glass). Ludlum meters are mostly analog, making them easy and inexpensive to repair if any internal parts fail. This being said, I noticed that newer Ludlum meters are made with a PCB which use those micro components which are much harder to work with unless you have proper tools for it.
Alternatives to Ludlum
Ludlum isn’t the only company producing high-quality radiation meters. Brands like Eberline and Johnson also offer fantastic meters that are worth checking out, often at a lower cost than a Ludlum.
For example, I found my Eberline 120 survey meter (which is similar to a Ludlum model 2) that came with an HP260 probe and a check source holder for a total of 110 British pounds, including shipping!
Good deals are out there—you just need to be patient and keep an eye out, and eventually, one will pop up.
A few final words
Ludlum meters are the industry standard for a reason, and I highly recommend checking them out. Their professional build, high performance, and versatility are what led me to purchase one for myself, and I have absolutely no regrets.
I’m curious to hear about the meters you use for your measurements. Do you have, or are you planning on investing in, a Ludlum meter? Let me know in the comments!
Thank you so much for reading this post, I hope you enjoyed it and learned something new! If yes, please make sure to subscribe to the email list so that you get notified when new posts are added. Also feel free to check out my Ko-Fi page where you can donate a nice cup of radioactive coffee and support my work financially.
We use cookies to ensure that we give you the best experience on our website. If you continue to use this site we will assume that you are happy with it.Ok