Ludlum Model 3 – The Best Meter I’ve Ever Used!

Welcome back my fellow radiation nerds! Today we will dive deep into what is arguably one of the best radiation meter out there, the Ludlum Model 3!

The history of Ludlum Meters

The Ludlum Measurements, Inc. was established in 1962 by Don Ludlum, who was an engineer with a background in designing radiation detection equipment. Not long after, it has produced its first commercially available meter, Ludlum Model 2. Ludlum’s official YouTube channel has a very interesting video on one of the very first units ever made with a serial number of 31, which I have linked in the description below.

His meters quickly gain popularity and good reputation for their reliability and long use life, which quickly established Ludlum Measurements as a trusted name in the world of radiation detection. The success of the initial models paved the way for the development of a wide range of survey meters and radiation detection equipment that continues to be used around the world to this today.

The versatility of Ludlum Meters.

Ludlum meters are the go to meters for many scientists and first responders, because of they are extremely rugged, reliable and easy to use design. Furthermore, Ludlum Measurements offers a wide range of probes and accessories which can be easily swapped out for various applications. Adding the long and proven track record, it is easy to see why Ludlum meters became the preferred choice for scientists worldwide.

Different Ludlum models

If you look at Ludlum’s product range, you will quickly realise that there are a bunch of different models out there. However for the personal use purpose, I think these are the ones worth considering.

Ludlum Model 2 – It is most basic, analog meter that Ludlum made (discontinued but can be found used). It has the 3 operating mode x0.1, x1, and x10 which might not be enough if you plan using it with sensitive detectors such as scintillator probes.

Ludlum Model 3 – A step up from Model 2. It offers extended measuring range (x100) and improved circuitry and electronics.

Ludlum Model 12 – Supports internal voltage measurement for easy switching between different probes which might require different operating voltage. For that reason, it also has an extended voltage range (400 to 2500 Vdc).

Ludlum Model 14c – Overall similar to Model 3, however it houses a small, gamma compensated GM tube which automatically operates when the scale is set to the x1000 mode.

Ludlum Model 2221 – Digital scaler/ratemeter with advanced data logging capabilities, often used for more precise and detailed measurements.

Ludlum Model 2241 – General-purpose scaler/ratemeter with a digital display.

There are plenty more of Ludlum models out there and if you want to learn more about them, I encourage you to read the detailed description on Ludlum website (click here).

Technical data and features of Ludlum Model 3

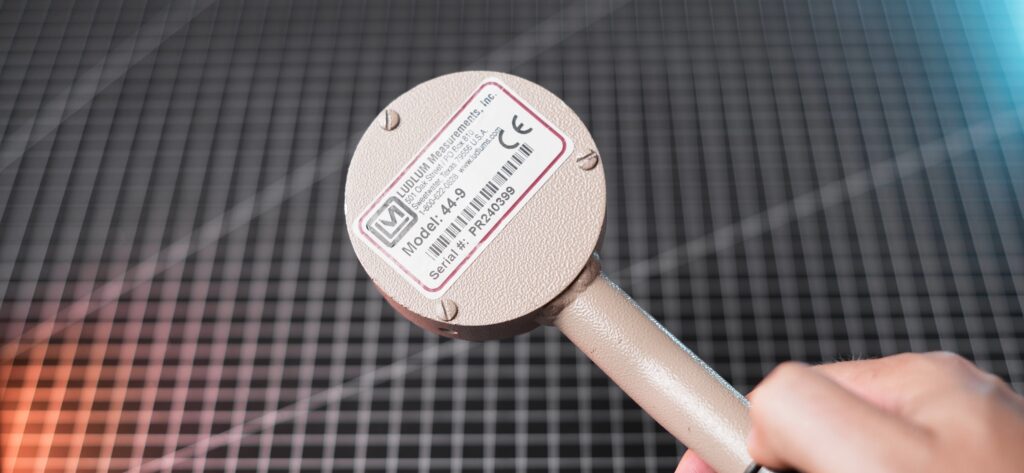
The Ludlum Model 3 has a range from 0 to 500,000 CPM and can supply voltage to the probe between 400 and 1500V. This flexibility allows it to work with a wide variety of detectors, including scintillators and some neutron detectors. Most of the time, I pair mine with a 44-9 probe, however I do change that occasionally depending on the situation

The meter features a rotary switch for selecting different measuring ranges and performing a battery test. It also includes both slow and fast averaging modes, which are particularly useful for obtaining accurate readings in varying conditions.

Powered by two D cell batteries, the Model 3 offers approximately 2000 hours of use. The batteries are housed in a separate compartment, which helps protect the electronics from potential damage in case of battery leakage. Additionally, all parts of the Ludlum Model 3 are sealed to prevent moisture from entering the meter, enhancing its durability.

These features clearly demonstrate that Ludlum meters are built to last and why they’ve earned their stellar reputation.
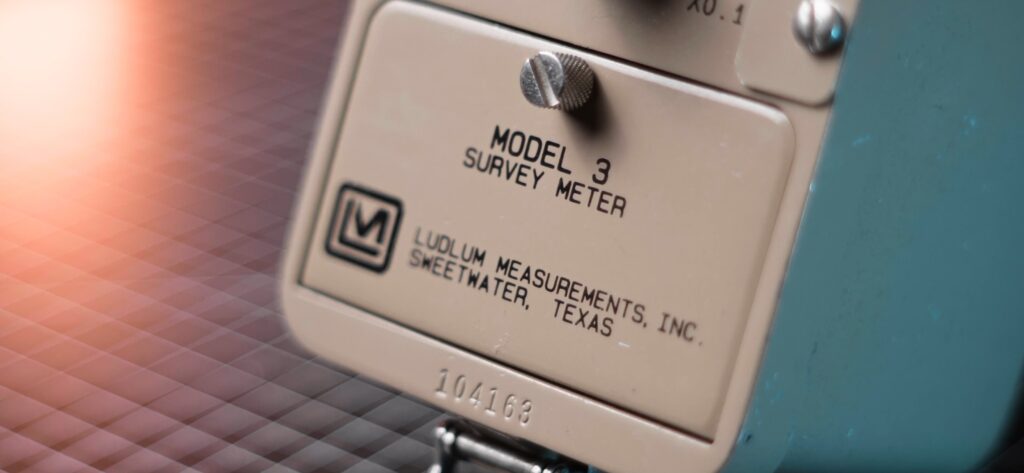
My Ludlum Model 3

I acquired my Ludlum model 3 a few years ago, and it has been my primary meter ever since. It has a serial number of 104163 and it was manufactured on April 16th, 1992. Despite its age, it operates flawlessly, having only small scratches from regular use. In order to ensure accurate readings, I calibrated my unit using a pulser made by GEOelectronics.

My unit has meter face showing only CPM. If you have seen my previous video on how to measure radioactivity, you know I am not a fan of dose units when used to measure activity of samples, so this works perfect for me. Ludlum does offer different meter faces for different probes, however I’d still recommend to sticking with the CPM.

Originally, my meter came with a “C” type connector, which is common on most Ludlum devices. However, this connector is hard to come by in Europe, so I replaced it with a BNC connector. This modification has made it much easier to find compatible cables and probes. The meter also came equipped with latches for a strap, which, while I don’t use them often, are a handy addition for prolonged use, as the meter can get heavy. Lastly, I crafted a probe holder for my 44-9 from a sheet of metal. While it’s not the most aesthetically pleasing, it gets the job done. I’m also thinking about adding a check source holder to the side of my meter, however I can’t seem to find one for a good price.
How to buy a Ludlum meter?

So, you want to buy a Ludlum meter. But where can you find one?

If you’re set on a brand-new meter, you can purchase directly from the Ludlum website. However, be aware that their prices are generally aimed at labs and government agencies, not private individuals. A new Ludlum Model 3, for example, costs around $1,000, and that’s without any additional accessories or probes.

In my opinion, it’s a far better choice to buy a used (or refurbished) unit online. Labs occasionally clear out old inventory, and this is the best time to find used meters and probes at a relatively low price. I got my meter during one such sale for fraction of what a new one would cost me.

When evaluating a used meter, ensure it’s in good visual condition (no dents, corrosion on battery ports or cracked glass). Ludlum meters are mostly analog, making them easy and inexpensive to repair if any internal parts fail. This being said, I noticed that newer Ludlum meters are made with a PCB which use those micro components which are much harder to work with unless you have proper tools for it.

Alternatives to Ludlum

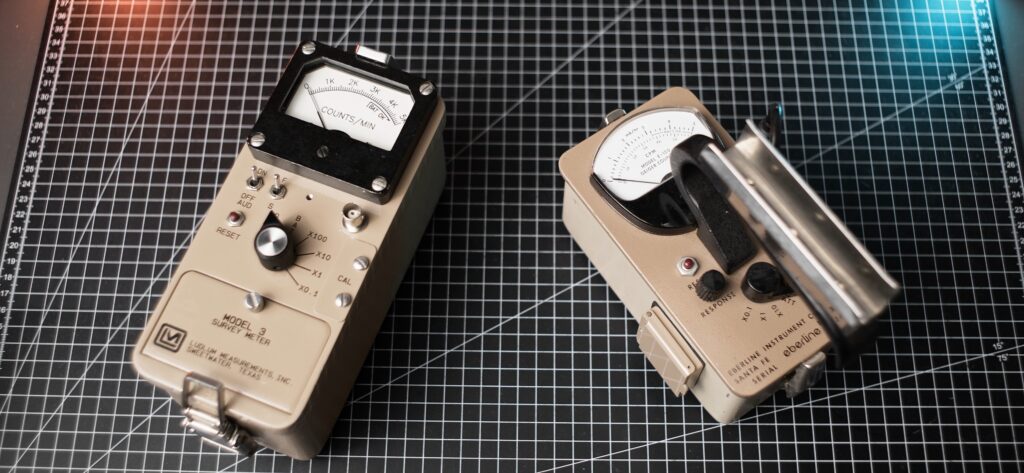
Ludlum isn’t the only company producing high-quality radiation meters. Brands like Eberline and Johnson also offer fantastic meters that are worth checking out, often at a lower cost than a Ludlum.

For example, I found my Eberline 120 survey meter (which is similar to a Ludlum model 2) that came with an HP260 probe and a check source holder for a total of 110 British pounds, including shipping!

Good deals are out there—you just need to be patient and keep an eye out, and eventually, one will pop up.
A few final words

Ludlum meters are the industry standard for a reason, and I highly recommend checking them out. Their professional build, high performance, and versatility are what led me to purchase one for myself, and I have absolutely no regrets.

I’m curious to hear about the meters you use for your measurements. Do you have, or are you planning on investing in, a Ludlum meter? Let me know in the comments!


Thank you so much for reading this post, I hope you enjoyed it and learned something new! If yes, please make sure to subscribe to the email list so that you get notified when new posts are added. Also feel free to check out my Ko-Fi page where you can donate a nice cup of radioactive coffee and support my work financially.

and remember, stay active!

Radioactive Contamination Found – Can We Identify It?

Welcome back my fellow radiation nerds! Today we will take a closer look at radioactive contamination inside of my lead pig container and try to identify the isotope behind it.

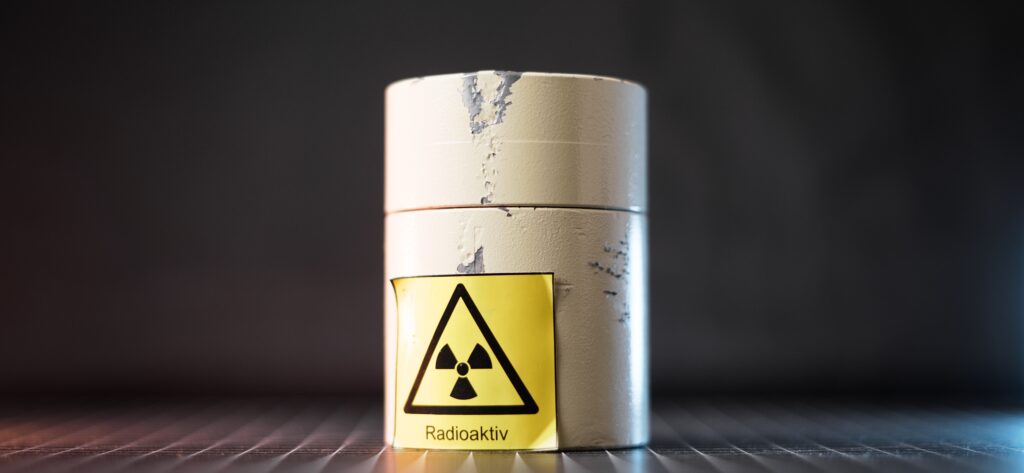
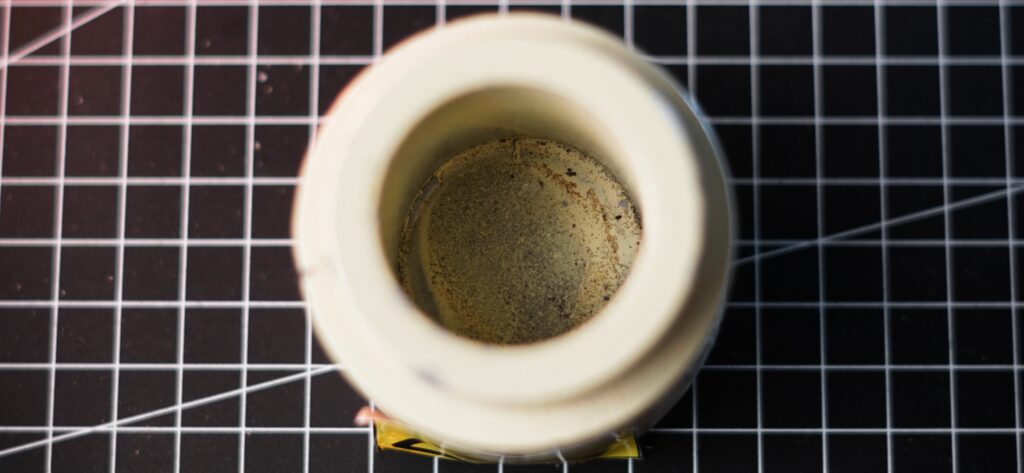
Lead pigs are lead containers used to store highly radioactive sources and shield their radiation to help minimise exposure. This one in particular originally came from one of the German nuclear power plants and it is made out of solid lead and weighs about 2kg. Although the container did not come with any radioactive sources, after unboxing the package, I noticed that the inside of the container emitted radioactivity and was most likely contaminated with some mysterious radioactive source.

This discovery was very exciting and I was very curious to find out what isotope was behind the contamination.

What are we dealing here with?

There plenty of different radioactive isotopes out there, some are natural such as Uranium and Thorium and their decay products, and some are man-made produced in nuclear reactors, in particle accelerators or during atomic tests.

In order to find out what isotope is behind the contamination, I need to narrow down my search and eliminate any isotopes that don’t match the characteristics and properties of the one inside the lead pig.

I’ll start by checking what type of radiation is being emitted from the container. First, I’m going take a measurement first without any shielding and then I’ll start introducing different materials to block out different types of radiation and compare the results. For this purpose I will use my Ludlum Model 3 with a 44-9 probe as it can easily detect alpha, beta and gamma radiation.

  • Alpha particles can travel in air up to 5cm and can be easily stopped with a thicker piece of paper.
  • Beta particles can travel up to half a meter in air and can go through low density materials but a piece of aluminium should be enough to block them.
  • Gamma rays can travel very long distances and are the hardest to shield requiring very dense materials such as Lead or sometimes even Uranium.

From my first measurement without any shielding and I got a result of about 1000 CPM at 1cm distance from the lead pig. After placing a piece of paper between the probe and the container, the result remained unchanged. This meant that there are pretty much no alphas being emitted by the source.

Next, I’ve added a piece of aluminium and the readings dropped significantly, all the way back to background levels meaning that the source was a primarily a beta emitter and even if there was some gamma radiation, it was extremely low and not detectable by my meter.

Gamma Spectroscopy

Although I haven’t detected any gamma radiation above background levels, I still decided to do a gamma spectroscopy with my RAYSID. Sometimes even trace amounts of gamma radiation are enough to build a good spectrum and identify different isotopes.

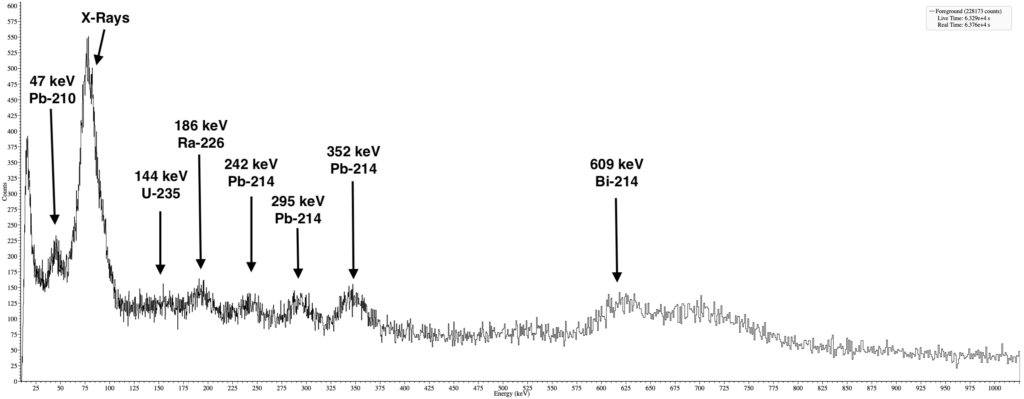
Inside my lead castle, the background activity is only 1.2 CPS when measured with my RAYSID. After placing the lead pig container inside, I got reading of 3.5 CPS and after collecting data for few hours, I managed to create a gamma spectrum of the lead pig.

The gamma spectroscopy revealed peaks that are characteristic for Uranium ore. I spoke with the previous owner and he did mention that he stored uranium ore inside so definitely there is a chance that a small piece broke off the mineral and is at the bottom of the container, however the amount of beta radiation compared to gamma could hint at another contaminant but unfortunately I don’t have the tools to properly check or identify it.

Conclusion

This is actually not the first time that I see a contaminated lab equipment. A friend of mine has a lead pig that is contaminated with radioactive Cs-137 as a result of a chemical spill inside of it.

I want to hear from you, did you ever find some contaminated lab gear and do you think the remains of Uranium ore are the only contamination inside of my lead pig or could there be some other radioactive isotope. I’m looking forward to hearing your suggestions and answers in the comments below.


Thank you so much for reading this post, I hope you enjoyed it and learned something new! If yes, please make sure to subscribe to the email list so that you get notified when new posts are added. Also feel free to check out my Ko-Fi page where you can donate a nice cup of radioactive coffee and support my work financially.

and remember, stay active!
Is the Better Geiger S-2 actually better?

Welcome back my fellow radiation nerds, Today we are taking a closer look at the BetterGeiger S-2 meter and if it’s really a better geiger counter!

Geiger counters are one of the most common tools for measuring the radiation around us, but they’re not perfect. They often suffer from limitations such as inaccurate dose rates and low sensitivity which are a characteristic of the Geiger-Muller tube used by the most meters.

In the recent years, there has been a surge in products that use small scintillation crystals instead of the more traditional GM tubes but they are usually more advance devices, target at experienced users, not entry level amateurs

This is where the BetterGeiger S-2 meters comes in

BetterGeiger S-2

First things first, I would like to thank Robert from Better Geiger who was kind enough to provide me with the S-2 meter making this video possible.

The Better Geiger S2 is a personal radiation detector manufactured in Colorado, USA. It is made out of high quality plastic which feels solid and durable and for extra protection, the unit is wrapped in a rubber case which should prevent it from any fall damage if it would slip out of hand.

While slightly on the bigger side, it can be operated singlehandedly and navigating through the menus and setting was pretty simple and intuitive.

Despite its name, Better Geiger does not use a geiger muller tube. Instead it has a small scintillation crystal which gives about 100 CPM of background activity and is rated for a maximum dose rate of 100 mSv/h for Cs-137.

Unlike most geiger counters, BetterGeiger factors in the different gamma energies detected to give accurate gamma dose readings. The measurements can be displayed as uSv/h, mRem/h or CPM and the unit does also has an alarm feature which threshold can be adjusted to the user’s preference.

While it can detect some strong betas, it’s not particularly sensitive to them and I think it’s better to think of the meter as gamma only.

When compared to my other meters, the BetterGeiger showed much higher sensitivity to gamma radiation which is particularly helpful when looking for radioactive minerals. I got a few uranium hunting trips planned, and I’m very excited to take the meter with me and see how it performs.

Improvements for the future BetterGeiger S-3

I really did enjoy using the BetterGeiger S-2 meter, however I see some potential improvements for future versions to make it even better.

The firstly, I would love to see a bigger sensor which would increase the sensitivity of the meter.

Secondly, I would move the sensor to the top of the meter. At the moment it is facing the user, making it hard and impractical to measure different sources, as it’s not always easy to see the readings on the screen.

Thirdly, I would like to see an improved algorithm which would quickly adjust the readings when there is a sudden increase in activity but then stabilises once the correct measurement is reached. The one currently used is definitely not bad and does the job well but it would make the unit faster and more responsive.

Lastly, the plastic used over the display screen is way too soft which makes it very easy to scratch. I would to see it replaced with a harder one that is more resistant to wear and tear of everyday use.

So, is it worth it?

Considering that the unit is priced at just under 150 dollars, I think it is a good alternative to many other meters in the same price range. I love that it shows accurate gamma dose readings and that it has a higher sensitivity to gamma radiation than a conventional geiger counter. While it isn’t the perfect tool for everyone, as it doesn’t detect beta radiation very well, I think it’s still solid meter offering something new and unique to the market.

I want to hear from you. What are your thought about Better Geiger S-2 and do you have any experience in with it? Let me know in the comments below!


Thank you so much for reading this post, I hope you enjoyed it and learned something new! If yes, please make sure to subscribe to the email list so that you get notified when new posts are added. Also feel free to check out my Ko-Fi page where you can donate a nice cup of radioactive coffee and support my work financially.

and remember, stay active!
Youtube Video

What people forget when collecting uranium minerals…

Welcome back my fellow radiation nerds. Today we will explore a the radioactivity of a noble gas that is the second leading cause of lung cancer, Radon 222!

During my recent trip to US, I visited a couple of famous uranium mining sites including Mi Vida and Cotter mines. There I collected a few small samples of the uranium minerals and while the radiation coming from those samples might be a bit high when measured up close, it is important to remember that they are point sources and with distance, the activity drops quickly back to normal levels. Furthermore, the plastic display boxes I keep the samples in, prevent the spread of any particles and pieces that might have fallen off the main mineral.

However what concerns me is not the radiation coming from the Uranium minerals, but a gas emitted by them called Radon.

So what’s the deal with radon?

Radon 222 is a naturally occurring radioactive element with an atomic number of 86 and it is a part of the uranium decay chain, directly being produced by the decay of Radium 226. It was first identified in 1899 by Ernest Rutherford and Robert B. Owens at the McGill University in Montreal, making it the fifth radioactive element to ever be discovered. It has a half-life of 3.8 days and it decays into Polonium 218 through alpha emission with an activity of 5.67 × 10¹⁵ Bq/g (5.67 PBq or 153 Curies).

What makes Radon particularly dangerous, is its possible buildup in side of buildings as it escapes from ground as a result of natural uranium decay. Its detection is challenging as Radon is a noble gas and it doesn’t have any smell, taste or colour and can only be detected using specialised equipment. This results in Radon gas being the second leading cause of lung cancer, second only to smoking cigarets.

Furthermore, Radon decay products can easily attach themselves to anything they come in contact with, this includes cloths, hair and also lungs if inhaled. While the half-life of radon is only 3.8 days, it decays into toxic, heavy metals including Polonium, Thallium and Lead. This means that if inhaled, these elements will remain in the lungs and eventually be absorbed by the body.

In some countries, Radon tests are mandatory for residential and public buildings and the levels should not exceed 300bq/m3, although WHO recommends to keep the levels below 100Bq/m3 and EPA recommends action if radon levels exceed 148 Bq/m³ (about 14 pCi/L).

If you have ventilation system with air filters inside your building, you can do a simple experiment and check the filters for Radon using a simple geiger counter. I did that at my parent’s place and their filters clearly showed increase levels of radiation. This is perfectly normal and should not be anything to worry about as long the Radon levels inside the house are within the recommended limits.

A gamma spectroscopy of an active carbon sample that has been exposed to radon gas shows interesting spectrum. While it is similar to Uranium or Radium, it clearly misses peaks from isotopes found higher in the decay chain

Here is a gamma spectrum of uranium ore for comparison. As you can see, the peaks from U-235 and Ra-226 are missing

Isn’t my geiger counter good enough?

Now you may wonder, I have a geiger counter, can’t I use it to measure radon? Well, technically yes, but it’s a bit more complicated than that. While a Geiger counter can detect radiation from radon decay products, it is not an ideal tool for the detection of radon gas or measuring its concentration. In order to do that a dedicated radon meter must be used which is specifically designed for this purpose and will give precise, long-term measurements, which are essential for evaluating any potential health risks from radon exposure.

Aranet Radon Plus & Aranet Radiation Meters

In order to keep track of the radon levels at my home, I reached out to the amazing guys over at Aranet who have kindly provided me with their Radon Plus & Radiation meters which inspired and made this video possible.

The meters look great and have very nice, elegant design and use a E-Ink displays, which looks fantastic and consumes very little energy allowing them to run for multiple years on just two AA batteries which come included in the box. The initial setup and connecting the meters to the Aranet phone app was a piece of cake and the app allows to get much more insight about the data being recorded.

Both meter are fairly compact and have the same width and hight, however they do differ in their depth as the Radon Plus uses ionisation chamber which requires extra room compared to pin diode detector used by background radiation meter.

Aranet Radon Meter can switch between different averaging periods from 10 min, 24h, 7d, 30d. Radon levels do fluctuate depending on the weather, temperature and other environmental factors and this allows for obtaining precise and accurate readings over time.

If you want to learn more about those meters, make sure to either check out Aranet website (click here) or their YouTube channel.

My Radon Levels

Coming back to my concern about the radon levels. After setting up both meters, I allowed them to run for a few day so that they could collect an average measurement. When I checked the Aranet app, I saw that the readings for Radon concentration were around 40Bq/m3 depending on the time of the day and the background radiation hovered at around 0.10uSv/h, which is more than acceptable and within the recommended limits.

Realistically, having just a few small uranium minerals should not cause any significant increase in radon levels but I’ll continue to monitor the readings just in case, especially since winter is coming and ventilating my home isn’t as easy as in the summer time.

What to do if my levels are high?

Although I haven’t measured any significant levels of radon at my home, this might not be true for everyone. If the your levels are elevated, the easiest solution is ventilate the room more often. In some extreme cases, a more drastic measures have to be taken which can include sealing off the basement floor or installing an active ventilation system but I’d recommend consulting a specialist first before taking any action.

Where to get Radon and Radiation home meters

If you are a collector of uranium minerals, radium watches or other items that can produce radon gas, a Radon meter is a definitely a must. This being said, if you live in an area with known to have high levels of Radon concentration, investing in a Radon meter is definitely a good idea.

The team at Aranet has also provided me with discount code for all viewers of the channel. So if you decide to buy a meter from Aranet, make sure the enter ALLRAD5 at checkout which will give you 5% off from your order. Alternatively you can also use the links in the description of the video:

Radon meter: https://bit.ly/4dNCZdn
Radiation meter: https://bit.ly/3ZkwkTI

Thank you Aranet once again for providing me with the meters and making this video possible!

I’m curious to hear about your experiences with Radon. Do you live in high radon area, do you use a Radon meter and how do you control the levels at your home? Let me know in the comments below!


Thank you so much for reading this post, I hope you enjoyed it and learned something new! If yes, please make sure to subscribe to the email list so that you get notified when new posts are added. Also feel free to check out my Ko-Fi page where you can donate a nice cup of radioactive coffee and support my work financially.

and remember, stay active!
Uranium in Fossils? Testing a Radioactive Megalodon Tooth

Welcome back, fellow radiation nerds! Today, we’re diving deep into the radioactivity of ancient dinosaur fossils!

My Sample

During my recent trip to US, I visited the Meteor Crater which was an absolute amazing experience. After the tour, I went to the souvenir shop where I spotted some Megalodon teeth. I heard before that sometimes they can be radioactive, so I quickly took out my Terra-P Geiger counter and I got very excited when my meter started showing increased levels of radiation. Of course, I couldn’t leave without taking one home, and here I am!

Gamma spectroscopy and the activity

I was curious to what isotope made the my tooth radioactive so I used my RAYSID gamma spectrometer, to create a gamma spectrum which revealed that the tooth contains natural uranium. While the activity isn’t particularly high compared to something like uranium ore, it is definitely detectable and reads just under 1000 CPM on my Ludlum Model 3 with a 44-9 probe at 1cm distance and around 0.5uSv/h on my RAYSID also at 1cm distance.

How does a fossil become radioactive?

During the process of fossilisation, organic material is being replaced with the surrounding minerals, and if those minerals are contain uranium, the fossil can absorb them and become radioactive over time.

This isn’t just limited to Megalodon teeth either—it can happen to all fossils. For example, at the Grants Mining Museum in New Mexico, there are several dinosaur fossils with significant radioactivity due to them being fossilised in a uranium-rich environment.

Speaking of the Grants Uranium Mining Museum, I highly recommend visiting it if you get a chance. There is a lot of fascinating information and exhibits in it and the underground tour was a truly unique experience. I used to be a guide in a Uranium mine and I found it particularly interesting to see how uranium mining techniques compared between America and Eastern Europe.

Radiometric dating of fossils and rocks

Thanks to the decay of radioactive isotopes, scientists can estimate the age of different fossils. This process is known as radiometric dating, and some of the most commonly used isotopes are:

Carbon 14 – Naturally occurs in all living organisms and has a half-life of 5730 years. When the organism dies, it stops the resupply of carbon which allows scientist to date samples up to 50 000 years old.

Potassium 40 – It has a half-life of 1.25 Billion years and just like Carbon 14, it naturally exists in all living organisms. Since the half-life of K-40 is much longer, it allows scientists to date samples that are million of years old.

Uranium 238 – This method is used for dating zircon crystals found in volcanic ash layers associated with fossils. Uranium isotopes decay to lead isotopes with a half-life of 4.47 billion years, making it ideal for dating ancient rocks.

A few final words

Exploring the radioactivity of my Megalodon fossilised tooth was a lot of fun and I have learned a lot!

I’m curious to hear, do you have any radioactive fossils in your collection or maybe you didn’t even know they can be radioactive and you will check them now? Let me know in the comments!


Thank you so much for reading this post, I hope you enjoyed it and learned something new! If yes, please make sure to subscribe to the email list so that you get notified when new posts are added. Also feel free to check out my Ko-Fi page where you can donate a nice cup of radioactive coffee and support my work financially.

and remember, stay active!

Terbium 161 and its radioactivity!

Welcome back fellow radiation nerds, today we will learn about the radioactivity of Terbium 161!

Element Terbium

Terbium (Tb) is a rare earth element with an atomic number of 65. It has only one naturally occurring isotope, Tb-159 and it is stable. It has been discovered in 1843 by a Swedish chemist, Carl Gustav Mosander who also the chemist behind the discovery of Lanthanum, which radioactivity and uses, I already covered in an earlier video. Since Terbium is part of the Lanthanide series, it shares many of their chemical and physical properties.

Terbium 161 and its radioactivity

Terbium 161 is a short lived radioactive isotope of Terbium and it is produced by the irradiation of stable Gadolinium 160 in the PRISMAP network of research nuclear reactors which include Maria at NCBJ (Poland), RHF at ILL (France), BR2 at SCK CEN (Belgium) and SINQ spallation neutron source at PSI (Switzerland).

Terbium 161 gamma spectrum, RAYSID Gamma Spectrometer (FWHM <7%)

It has a half-life of just under 7 days and it decays through a beta emission into stable Dysprosium 161 and in the process it also releases a gamma ray at 25.7, 48.9 and 74.6 keV which my RAYSID had no problem in detecting.

My sample of Terbium is in a form of TbCl3 solution and it has activity of around 100-150 Bq. On my RAYSID Gamma Spectrometer I got only 16 CPS when measured inside of my lead castle, with the sample placed as close as possible to the detector. The soft beta radiation coming from the Terbium 161 is being shielded by the plastic container and I only got marginally higher activity compared to background with my Ludlum Model 3 Meter with 44-9 probe at 1cm distance.

Uses

Terbium 161 is currently being tested for use in nuclear medicine to treat prostate cancer and in imaging techniques such as SPECT (Single Photon Emission Computed Tomography).

Summary

While I don’t have much time left with this sample before it decays, it was a great fun measuring its radioactivity and learning about it. I’m curious to hear your thoughts on Terbium 161 and what did you find most interesting about it, let me know in the comments below!


Thank you so much for reading this post, I hope you enjoyed it and learned something new! If yes, please make sure to subscribe to the email list so that you get notified when new posts are added. Also feel free to check out my Ko-Fi page where you can donate a nice cup of radioactive coffee and support my work financially.

and remember, stay active!

How to accurately measure radioactivity

Radioactivity is all around us but how do we actually measure it? You probably heard people talk about Siverts, Curies, Becquerels, Count per Minute and many other types units, but which ones should we actually use?

Most units can be put into two categories, activity units and dose units.

Activity units

To measure the activity of radioactive objects we use unit called Becquerels, where 1 Bq is equal to 1 decay per second. If you are located in US, you are probably more used to using Curies where 1 Curie is equal to the activity of 1g of pure Radium 226, which is 37 billion (3.7 x 10¹⁰) Bequerels.

Many radiation meters use counts per minute (CPM) or counts per second (CPS) instead of Bequerels. This is because these units show the exact amount of radiation decay events detected by the geiger tube or scintillator used by the meter. Depending on the type of detector, its sensitivity will vary, meaning that some can show 200CPM while others can show 1000CPM for the same source.

When it comes to geiger muller tube detectors, one of the most commonly used by the scientific community is the LND7311, which is often found in the pancake style probes such as Ludlum 44-9.

The activity units are the best way to measure how active an object or an area is.

Dose units

The most common dose units are Sivert and REM (Roentgen Equivalent Man) and 1 Sivert is equal to 100 REM. Both Sievert and REM are used to measure the biological effect of ionising radiation on human tissue. Sievert is a SI unit, while the REM is a part of the older Centimeter-Gram-Second system or CGS for short. Similarly to the case with Becquerels and Curies, Siverts are used in most countries around the world, while the US still sticks with REMs.

Some geiger counters, such as Terra-P, show the readings only in dose units as they have been designed to be used in nuclear contaminated environment and quickly inform the user about the dose they are being exposed to.

These readings can be widely inaccurate when measuring radiation coming from other isotopes to which the meter has not been calibrated too, due to the differences in gamma ray energies that different isotopes produce. Here is an example, most geiger counters are usually calibrated for Cs137 which has gamma energy of 662keV. Americium 241 on the other hand has an energy of 59.5keV, while Cobalt 60 has energies of 1173 and 1332kev. This means that the dose emitted from these isotope wont be presented accurately when measured with a geiger counter that has been calibrated for Cs137. Some GM tubes are gamma compensated and will show more accurate results even when used to measure isotopes outside of their original calibration source, such is the case with the CDV-700 geiger counter.

Distance and inverse square law

When measuring samples, it is important to keep a distance between a source and the detector. This ensures accuracy and consistency, as it adheres to calibration standards and minimises errors from scattering and absorption. Furthermore, it optimises the detector’s sensitivity and efficiency while reducing the risk of contamination or accidental exposure, ensuring reliable and safe measurements.

Conclusion

Personally I try to always give the measurements in counts per minute which I get on my Ludlum Model 3 meter with a 44-9 Pancake Probe at 1cm distance from the source. This way I can ensure that the results are accurate, consistent and comparable between different test. Sometimes I also include a dose rate in uSv/h which I measure using my RAYSID gamma spectrometer which factors in the different gamma energies of the isotopes being detected.

Thank you so much for reading this post, I hope you enjoyed it and learned something new! If yes, please make sure to subscribe to the email list so that you get notified when new posts are added. Also feel free to check out my Ko-Fi page where you can donate a nice cup of radioactive coffee and support my work financially.

and remember, stay active!

Exploring What Happened in Bayo Canyon?

Welcome back fellow radiation nerds! Today we dive deep into what really happened in the Bayo Canyon!

Bayo Canyon is located east of Los Alamos, New Mexico and it is a place of striking natural beauty. With its breathtaking landscapes, towering cliffs, and vibrant wildlife, one might assume this area has been a peaceful retreat for ever, but in the 1940s, a series of powerful explosions shocked this place, leaving behind a legacy that endures to this day.

History

During the Manhattan Project, a team of scientists led by high explosive expert, George Kistiakowsky, was tasked with studying the behaviour of radioactive materials under extreme conditions. Their work was critical to the development of the plutonium implosion-type bomb just like the bomb Fat-Man which was later used over Nagasaki.

A total of 242 tests were conducted in Bayo Canyon, with each test using several hundred curies of radioactive materials, primarily radioactive Lanthanum-140 often referred to as “RaLa”, which has a half-life of just 40 hours , however, Lanthanum was not the only radioactive element used .

These tests continued until 1961 and in 1976, the government initiated a cleanup of the area, burying radioactive contaminants deep underground. Yet, to this day, debris can be easily found around the location of the test site with some pieces still exhibiting traces of radioactivity.

Today the Bayo Canyon has slightly elevated activity, though I’m not sure if it’s contamination from the test or is it from natural sources, as I’ve recorded the same increased activity pretty much through out my entire hike to the location of the test site.

Analysis of the samples collected

During my exploration of the canyon, I discovered around two dozen pieces, including metal shrapnel and cable wiring. When inspected closely, you can see how the intense force of the explosions tore the metal apart with ease.

From all the pieces I found, one appears to be radioactivity and clocks around 2000 CPM on my Ludlum Model 3 with a 44-9 probe at 1cm distance. This discovery was particularly intriguing, given that all radioactive Lanthanum-140 should have decayed by now. Curious to uncover its source, I conducted a gamma spectrum analysis of the sample using my RAYSID gamma spectrometer.

The analysis reveals peaks at 63, 93, and 186 keV, which are characteristic for Uranium. Given the small size of the peak at 186 keV, it’s likely that the sample contains depleted uranium instead of regular one as U-235 was in high demand for the production of the uranium bomb, Little Boy, which was later used over Hiroshima.

Summary

If you find yourself in Los Alamos with some time to spare, I highly recommend hiking through Bayo Canyon. Whether you’re a nuclear physics enthusiast or a casual tourist, the canyon offers stunning natural beauty, diverse wildlife, and a unique glimpse into the history of atomic bomb development. The hike is about 1.5 hours one way, so be sure to bring plenty of water and prepare accordingly!

Thank you so much for reading this post, I hope you enjoyed it and learned something new! If yes, please make sure to subscribe to the email list so that you get notified when new posts are added. Also feel free to check out my Ko-Fi page where you can donate a nice cup of radioactive coffee and support my work financially.

and remember, stay active!

Exploring Krypton 85 and its radioactivity

Welcome back fellow radiation nerds, today we dive deep into the radioactivity and uses of Krypton 85!

Krypton is a colourless, tasteless and odourless noble gas and it was first discovered in 1898 by Wiliam Ramsay and Morris Travers. It has atomic number of 36 and its most common isotope is Krypton 84, which is stable.

Kr-85 on the other hand, is radioactive and it was first discovered in 1940 by Martin Kamen and Sam Ruben, during their research involving the neutrons bombardment of stable Krypton isotopes, at the University of California, Berkeley.

Krypton-85 is predominantly produced through human activities such as nuclear fission and the reprocessing of spent nuclear fuel, however, traces of Krypton 85 are also produced naturally by the interaction of cosmic rays with a stable Krypton-84 found in Earths atmosphere.

Some of the main uses of the radioactive Krypton 85 are in arc discharge lamps and in cold-cathode voltage regulator electron tubes. Since Krypton is a gas, it can also be used to find leaks in closed systems and small defects in aircraft components.

Radioactivity & Gamma spectroscopy

Krypton-85 is a radioactive isotope with a half-life of approximately 10.76 years. It decays by beta emission, transforming into stable rubidium-85 and in the process it also releases a gamma ray with an energy of 514 keV. 

Krypton 85 gamma spectrum, RAYSID Gamma Spectrometer (FWHM <7%)

My Sample

My sample comes in the form of an old DDR smoke detector produced by Robotron RFT. The model number is 70130 and it was used in industrial complexes. The actual radioactive source is a little glass bulb originally containing 18.5MBq of Kr-85.

Robotron office (Source: DNN.de)

Since the detector is couple decades old by now, the activity of Krypton 85 decreased but it is still detectable when measured with my RAYSID gamma spectrometer. When placed on the top of the detector, RAYSID showed an activity of 136 CPS and had no problem in detecting the peak at 514 keV.

German smoke detectors and the activity of their sources (source: geigerzaehlerforum)

The housing of the smoke detector acts like a shield and stops most of the beta radiation, which results only in a slight increase in the activity when measuring it with my Ludlum Model 3 Meter with a 44-9 probe. This however changes when the housing is removed and the glass bulb is exposed. At 5cm my Ludlum reads 500 000 CPM and it maxes out if brought any closer. RAYSID reads a gamma dose of 0.86 uSv/h (675 CPS) at 1cm distance.

Rundfunk RFD 70361 smoke detector source containing <18.5 MBq of Kr85

Overall I am very happy to finally get a chance to explore the radioactivity of Krypton 85 and share my experiences. I absolutely love shape and form of the source and I find it very interesting that this smoke detector uses Kr85 instead of much more common Am241. If you ever come by one of those detectors, they are a great find but be careful as the glass bulb is rather fragile and can easily break

Thank you so much for reading this post, I hope you enjoyed it and learned something new! If yes, please make sure to subscribe to the email list so that you get notified when new posts are added. Also feel free to check out my Ko-Fi page where you can donate a nice cup of radioactive coffee and support my work financially.

and remember, stay active!

Why is Coal Radioactive?

NORM is an acronym for Naturally Occurring Radioactive Material and it covers, well, all radioactive material that occurs is nature. Some of the main elements that make up NORM are Uranium Thorium and Radium. Traces of these elements can be found pretty much everywhere but sometimes their accumulation can result in radioactive contamination of materials which are not usually thought as radioactive.

Why is coal radioactive

Not that long ago, a friend of mine send me a sample of coal which comes from an area near Dresden in Germany. This region is very rich in coal deposits but they are not pure. Coal easily absorbs elements that surround it and in this case, it was in close proximity to uranium which resulted in it getting contaminated and also becoming radioactive.

The sample measures 6cm by 4cm by 3 cm and reads about 2 500 CPM on a pancake probe at 1cm distance. A gamma spectroscopy made with my RAYSID gamma spectrometer, shows a clear presence of natural uranium and its decay products.

RAYSID Gamma Spectrometer (FWHM <7%)

While this is an extreme example, coal can contain trace amounts of radioactive elements and burning it, will results in the release of these elements into the environment. Considering how much coal is burned to produce energy each year, it is safe to say that coal power plants produce more unregulated nuclear waste than any nuclear power plant does. It is ironic how some countries build coal power plants instead of nuclear ones since they are afraid of nuclear energy and yet coal power plants are the ones producing more unregulated nuclear waste and contaminating our environment with toxic elements.

Thank you so much for reading this post, I hope you enjoyed it and learned something new! If yes, please feel free to subscribe to the email list so that you get notified when new posts are posted. Also feel free to check out my Ko-Fi page where you can donate a nice cup of radioactive coffee and support my work financially.

and remember, stay active!